
Security Scanner (PII & DLP) helps teams detect sensitive data in Jira work items and their change history. It scans current content and past changes to highlight potential risks in one clear view.
This makes it easier for companies to reduce data exposure, stay compliant, and keep control over sensitive information stored in Jira.
Note: Starting with version 11.14.0, Security Scanner is included in the Standard plan of Issue History for Jira. You can scan Jira work items and their full change history to find exposed sensitive data.
Advanced features, including custom detection patterns, are available during the 30-day Advanced trial or with the Advanced plan.
Sensitive Data Types and Severity Levels
Security Scanner (PII & DLP) automatically scans Jira work items to find sensitive data, including:
|
Data type |
Severity |
Score |
|---|---|---|
|
Password |
🔴🔴🔴🔴🔴 |
5 (Critical) |
|
Credentials |
🔴🔴🔴🔴🔴 |
5 (Critical) |
|
Credit Card |
🔴🔴🔴🔴🔴 |
5 (Critical) |
|
Social Security Number |
🔴🔴🔴🔴🔴 |
5 (Critical) |
|
Document ID |
🔴🔴🔴🔴🔴 |
5 (Critical) |
|
AWS Client ID |
🔴🔴🔴🔴🔴 |
5 (Critical) |
|
AWS MWS Key |
🔴🔴🔴🔴🔴 |
5 (Critical) |
|
AWS Secret Access Key |
🔴🔴🔴🔴🔴 |
5 (Critical) |
|
Google API Key |
🔴🔴🔴🔴🔴 |
5 (Critical) |
|
Google OAuth Client ID |
🔴🔴🔴🔴🔴 |
5 (Critical) |
|
Google OAuth Access Token |
🔴🔴🔴🔴🔴 |
5 (Critical) |
|
GitHub Token |
🔴🔴🔴🔴🔴 |
5 (Critical) |
|
Generic API Key |
🔴🔴🔴🔴🔴 |
5 (Critical) |
|
Generic Secret |
🔴🔴🔴🔴🔴 |
5 (Critical) |
|
Stripe API Key |
🔴🔴🔴🔴🔴 |
5 (Critical) |
|
SendGrid API Key |
🔴🔴🔴🔴🔴 |
5 (Critical) |
|
Slack Token |
🔴🔴🔴🔴🔴 |
5 (Critical) |
|
Slack Webhook URL |
🔴🔴🔴🔴🔴 |
5 (Critical) |
|
Azure Storage Access Key |
🔴🔴🔴🔴🔴 |
5 (Critical) |
|
Mailgun API Key |
🔴🔴🔴🔴🔴 |
5 (Critical) |
|
Mailchimp API Key |
🔴🔴🔴🔴🔴 |
5 (Critical) |
|
Shopify Secrets |
🔴🔴🔴🔴🔴 |
5 (Critical) |
|
Shopify Partner API Access Token |
🔴🔴🔴🔴🔴 |
5 (Critical) |
|
Square Access Token |
🔴🔴🔴🔴🔴 |
5 (Critical) |
|
Square OAuth Secret |
🔴🔴🔴🔴🔴 |
5 (Critical) |
|
SSH Private Key |
🔴🔴🔴🔴🔴 |
5 (Critical) |
|
SSH Public Key |
🔴🔴🔴🔴🔴 |
5 (Critical) |
|
RSA Private Key |
🔴🔴🔴🔴🔴 |
5 (Critical) |
|
PKCS8 Private Key |
🔴🔴🔴🔴🔴 |
5 (Critical) |
|
PGP Private Key |
🔴🔴🔴🔴🔴 |
5 (Critical) |
|
EC Private Key |
🔴🔴🔴🔴🔴 |
5 (Critical) |
|
Password in URL |
🔴🔴🔴🔴🔴 |
5 (Critical) |
|
Phone Number |
🔴🔴🔴🔴 |
4 (High) |
|
Email Address |
🟡🟡🟡 |
3 (Medium) |
|
IP Address |
🟡🟡🟡 |
3 (Medium) |
|
Physical Address |
🟡🟡🟡 |
3 (Medium) |
|
Username / Login |
🟡🟡 |
2 (Low) |
|
ZIP Code |
🟡 |
1 (Minimal) |
Detected findings are displayed in a structured table, making it easy to review and prioritise work items that need attention.
How does it work?
-
In your Jira, go to Apps, find Issue History by SaaSJet and in its left sidebar menu choose Security Scanner.

-
Select what to scan using filters. You can filter work items by space, sprint, JQL, and more.
-
Set the date range to specify the time period to scan (current content and history within that range).
-
Review the generated report. It shows work items (Jira work items where sensitive data was detected), type of finding (category of detected sensitive data (for example, password or API key), security finding (detected sensitive data), severity score (indicates how much attention the finding may need).

Security Scanner helps users quickly see where sensitive data appears in Jira work items and their history. Instead of manually checking work items one by one, you can get a clear list of findings in one place.
Historical finding (not present in the current state of work item)
Historical mark in the Field column indicates that the security finding is no longer present in the current content. It means sensitive data (such as a password, API key, or card number) appeared in a past change, for example, in an earlier comment or description, and was later removed or updated.

Why this matters:
-
Sensitive data may still exist in the work item history.
-
Historical exposure can be relevant for audits and compliance.
-
Teams can identify and address past data risks, not just current ones.
Hide sensitive Security Scanner results
Click the Hide sensitive data (eye) icon in the top-right corner of the table to mask all sensitive finding values, or use the eye icon next to an individual finding to hide or reveal only that specific value.


This feature helps prevent accidental exposure of sensitive information when reviewing findings, sharing your screen, or taking screenshots.
Search Security Scanner findings
Use the Search field in Security Scanner to quickly find specific sensitive data across detected findings. Search works with both masked and unmasked values, so you can locate relevant findings without exposing the full sensitive value.

Analyze Security Scanner findings with Rovo
Issue History for Jira includes Analyze with Rovo functionality, which lets you use Atlassian Rovo to quickly analyze Security Scanner findings with AI. Rovo reviews detected findings, identifies potential false positives, and provides recommendations for further investigation.
Note: Atlassian Rovo must be available for your Jira instance. Rovo is an AI-powered assistant for Jira and is available for users on paid Jira Cloud plans.
How to analyze findings with Rovo:
-
Open the Security Scanner and click Analyze with Rovo.

-
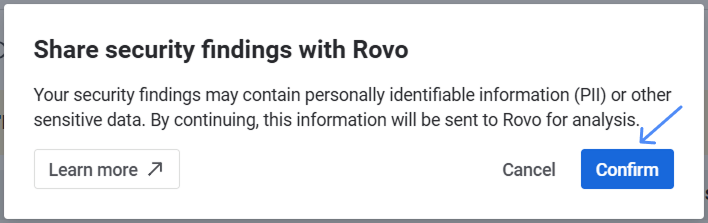
Review the modal window that appears, then click Confirm to send the selected security findings to Rovo for analysis.
-
Rovo generates a report that includes:
-
An overall summary of the findings.
-
A verdict for each finding.
-
Confidence level, explanation, and recommended next steps.
-
For example:

If there are many security findings, Rovo may analyze them in multiple batches. After the first analysis is complete, click Continue analysis to send the remaining findings to Rovo. Repeat this process until all findings have been analyzed.

Custom Detection Patterns
Security Scanner allows you to create custom detection patterns to identify sensitive information specific to your organization.
You can create a custom finding in two ways:
-
Create with AI — describe what you want to detect, add a few examples, and AI generates the regex pattern and its name.
-
Create manually — write your own regular expression (regex) and test it before saving.
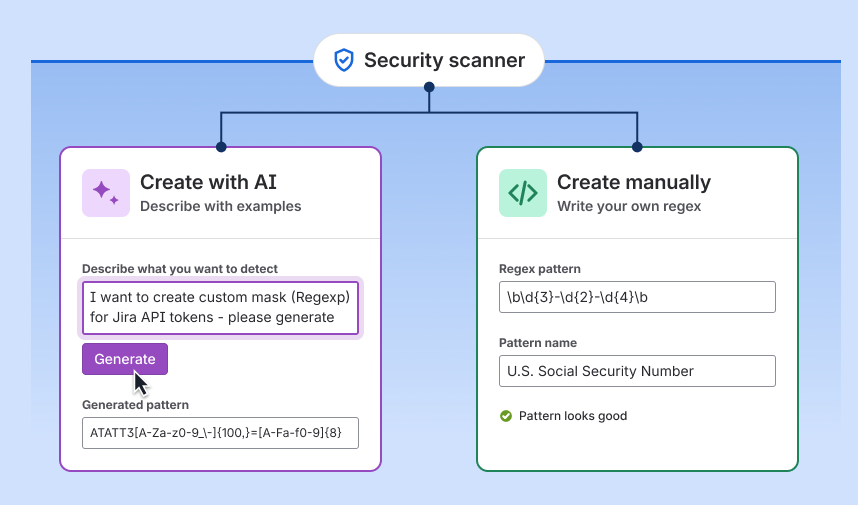
Once saved, the custom finding is included in Security Scanner scans, and its results can be filtered separately from default findings.
To create a custom finding, do the following:
-
In Jira, open Issue History for Jira and select Security Scanner in the left sidebar.
-
Start creating a finding in one of two ways:
-
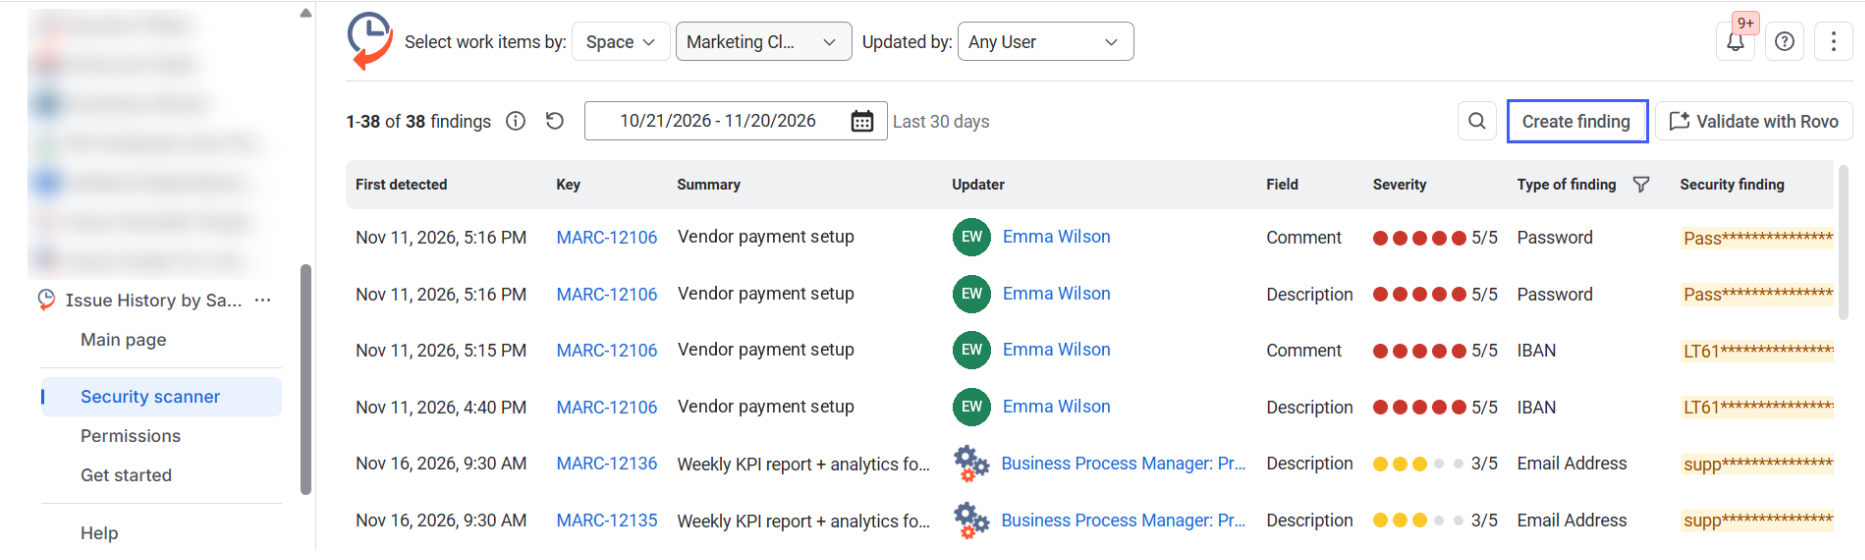
Click Create finding in the top-right corner, above the findings table.
-
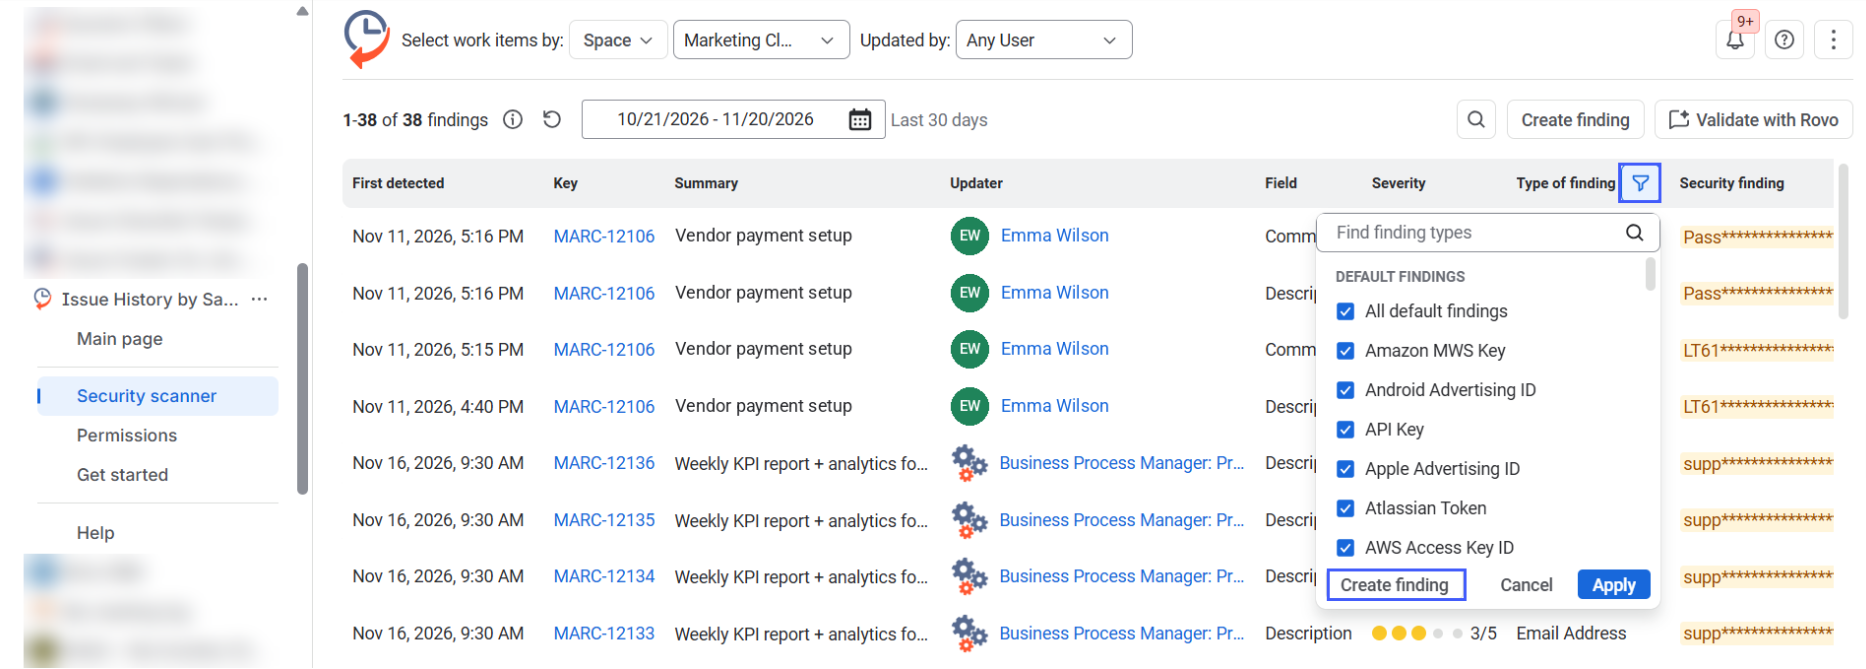
Or click the filter icon next to the Type of finding column, then click Create finding at the bottom of the dropdown.
-
The Create custom finding window opens.
-
At the top of the Create custom finding window, select one of the tabs:
-
Create with AI — best when you know what the data looks like but don't want to write regex. Go to Option A.
-
Create manually — best when you already have a regex or need full control over the pattern. Go to Option B.
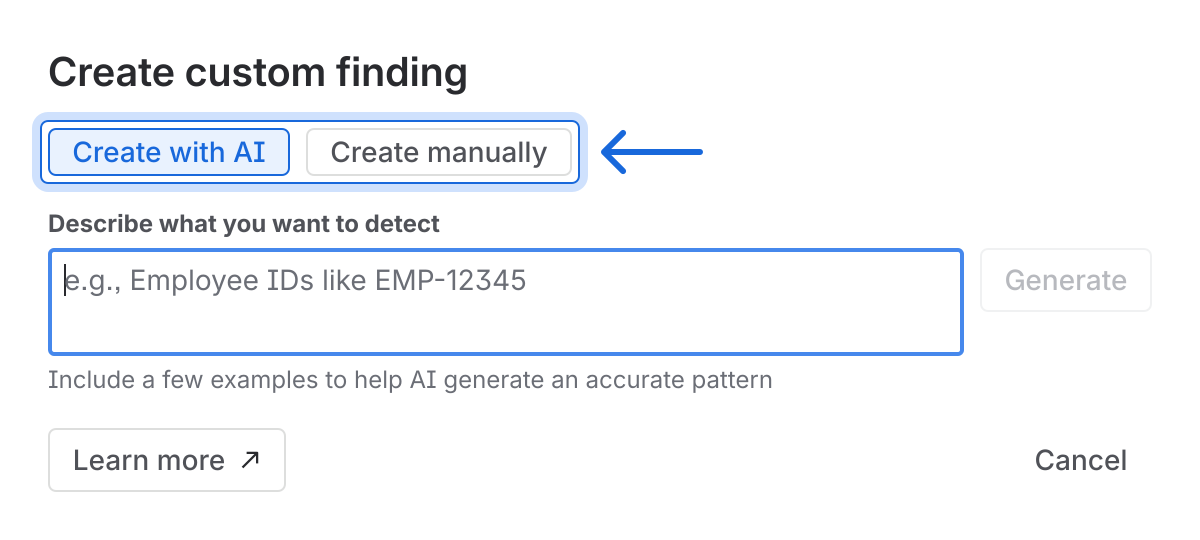
Option A. Create a custom finding with AI
-
Make sure the Create with AI tab is selected.
-
In Describe what you want to detect, describe the data in plain language and add a few examples. For example: Detect MongoDB connection strings with credentials (mongodb:// or mongodb+srv://). Examples: mongodb://user:pass@localhost
-
Click Generate.
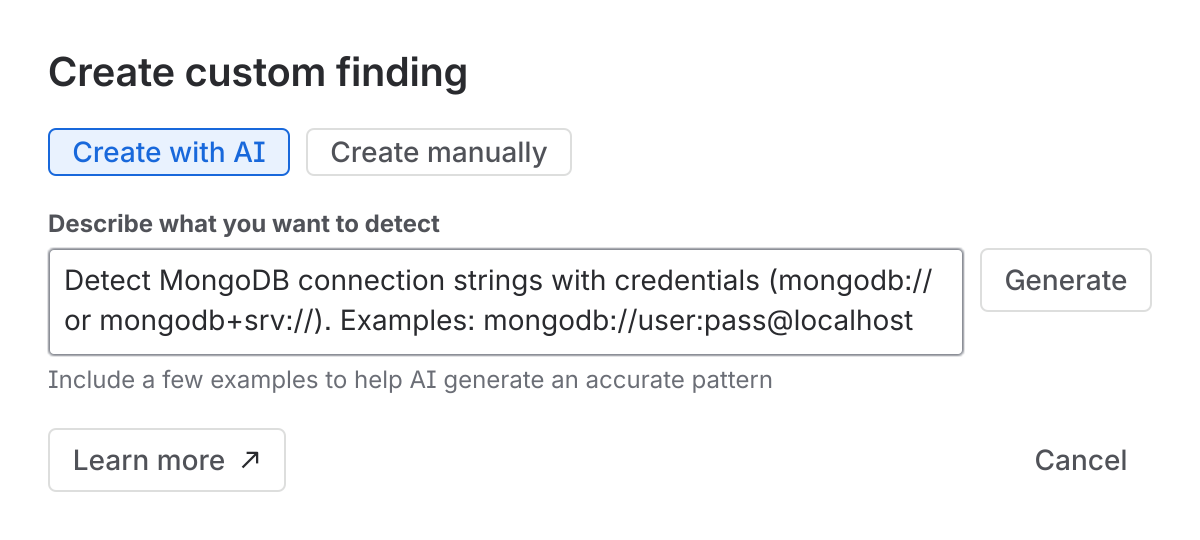
-
Review the result:
-
Generated pattern — the regex created by AI. You can edit it if needed.
-
Pattern name — the name shown in the Type of finding column and filter. Rename it if needed, for example MongoDB connection.
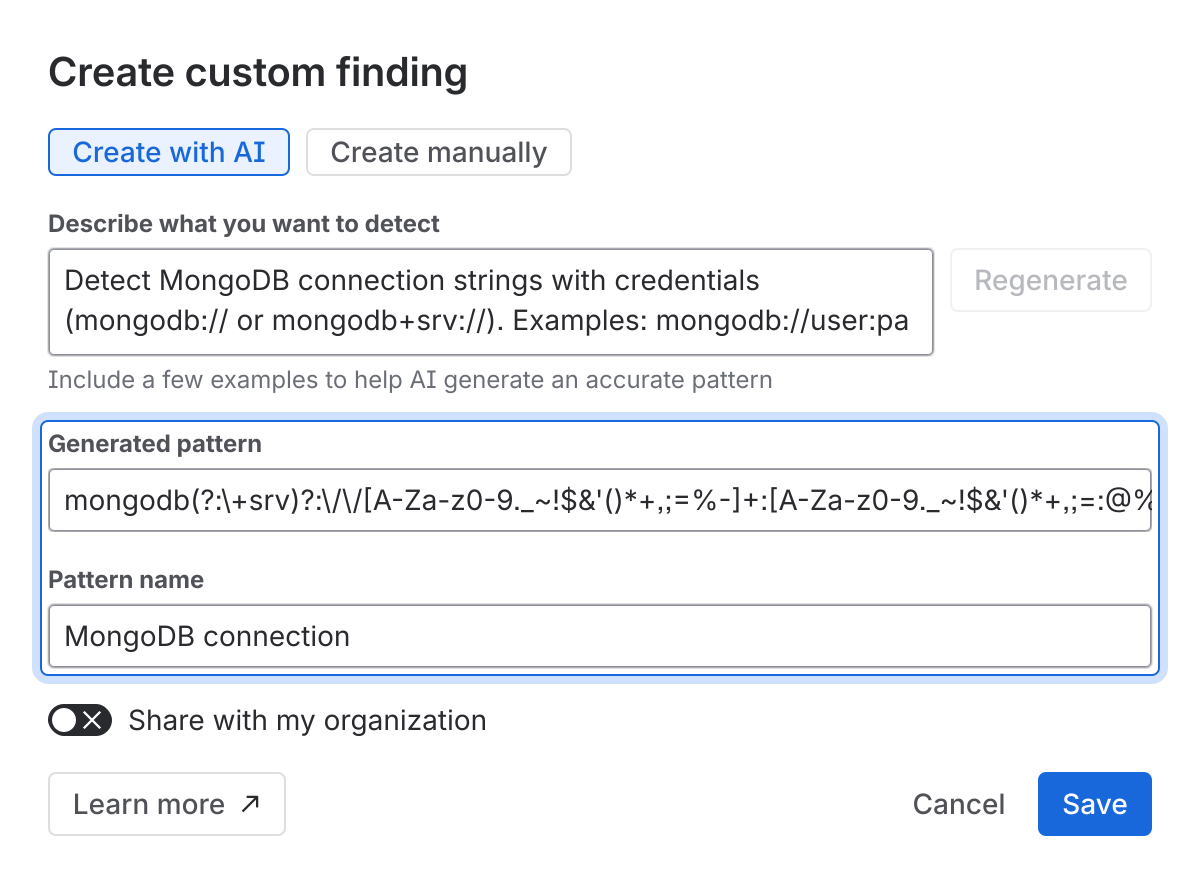
-
-
Not happy with the result? Refine the description and click Regenerate.
-
Optional: turn on Share with my organization to make this custom finding available to other users in your organization.
-
Click Save.
Tip: the more specific your examples, the more accurate the generated pattern.
Option B. Create a custom finding manually
-
Select the Create manually tab.
-
In Regex pattern (1), enter your regular expression. For example, a pattern for MongoDB connection strings starting with
mongodb(?:\+srv)?:\/\/. -
In Pattern name (2), enter a clear name, for example MongoDB connection. This name appears in the Type of finding column and filter.
-
Optional: turn on Share with my organization to make this custom finding available to other users in your organization.
-
Click Test (3) to check the pattern against sample data. Make sure it catches the values you need and doesn't produce false positives.
-
When the pattern works as expected, save the custom finding.
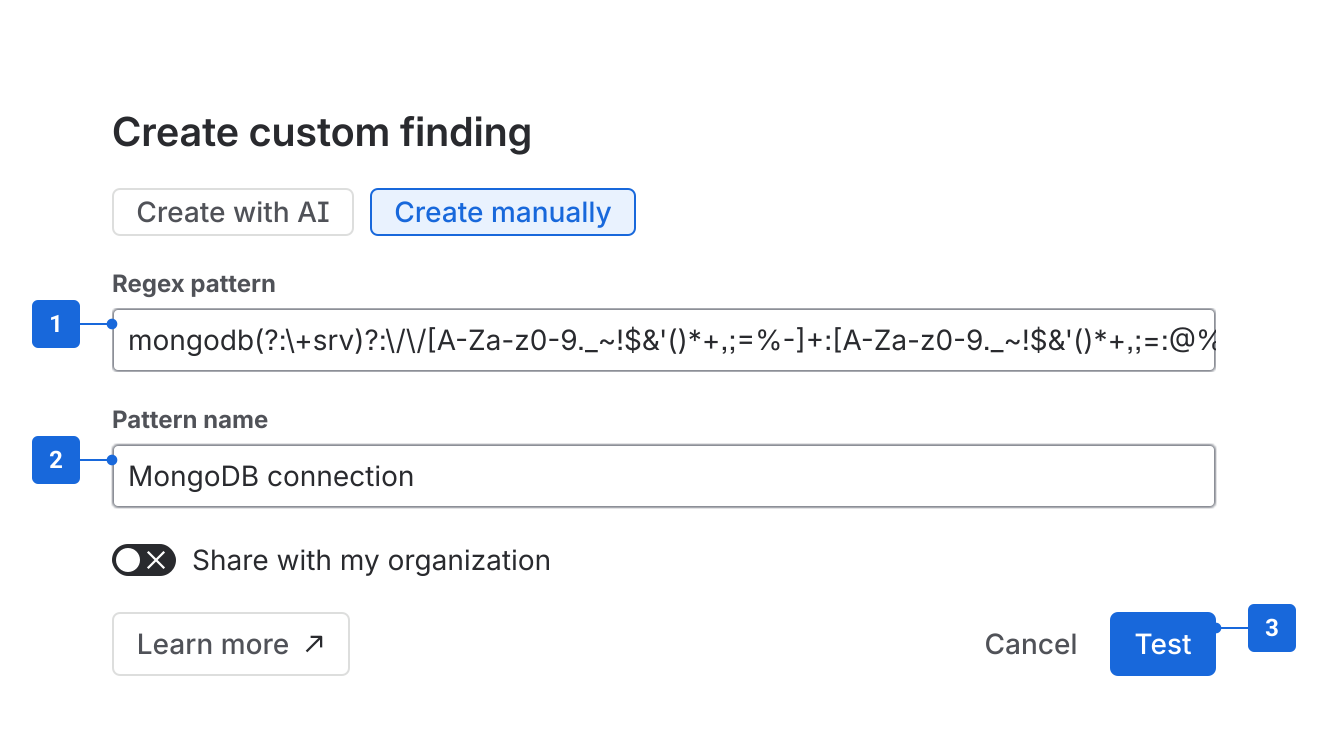
All custom findings are listed in the Type of finding filter, in the Custom findings group above Default findings.
-
Filter results: click the filter icon next to Type of finding, select the custom findings you need, and click Apply.
-
Edit: hover over a custom finding in the list and click the pencil icon.
-
Delete: hover over a custom finding in the list and click the trash icon.
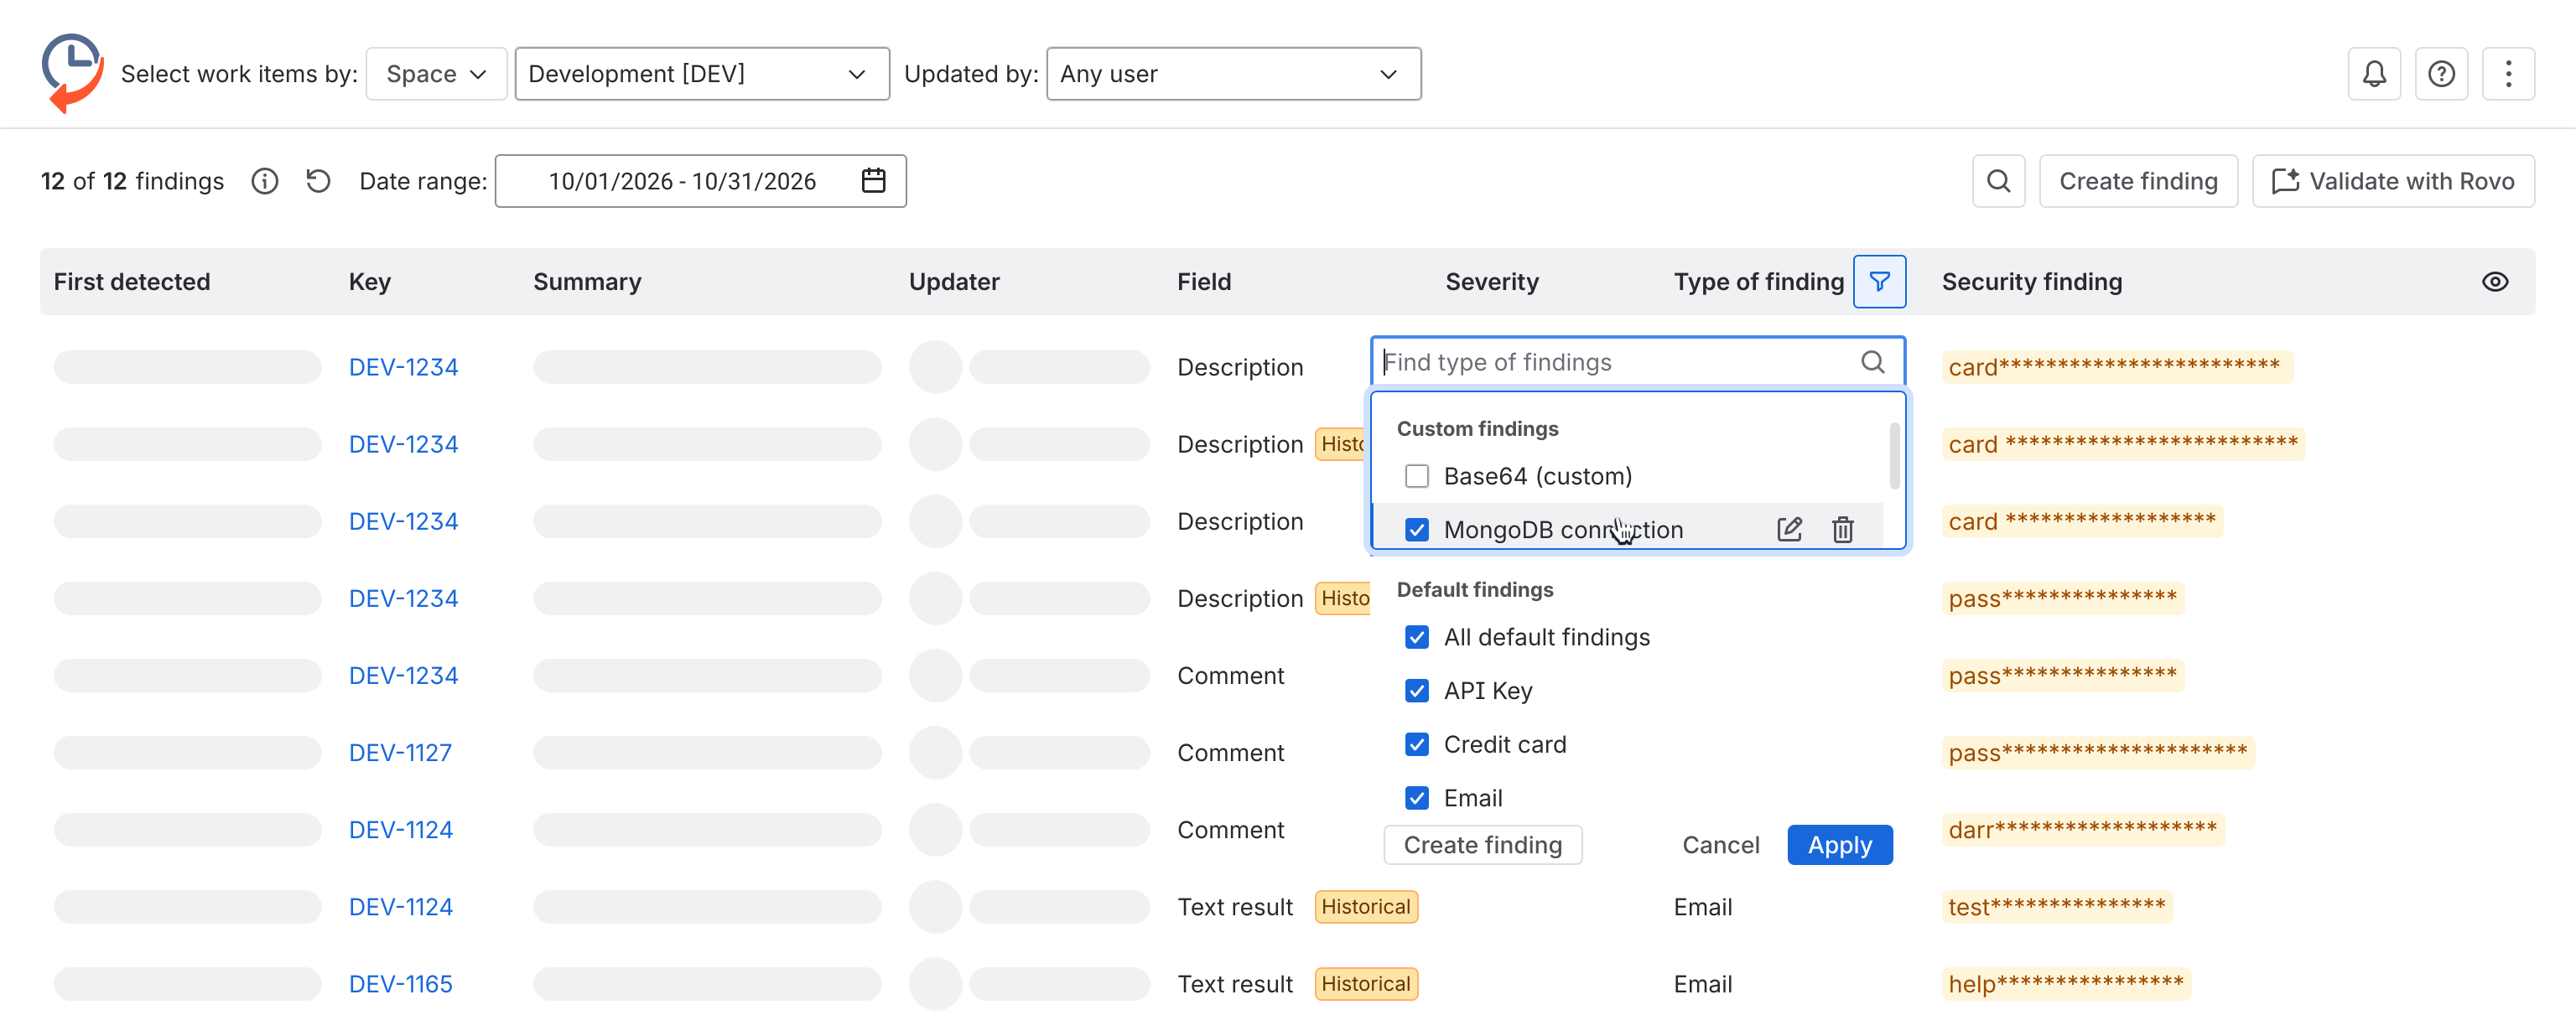
Default findings can be filtered the same way, but only custom findings can be edited or deleted.
Tips for accurate patterns:
-
Give each pattern a descriptive name so the team can recognize it in the findings table.
-
Keep patterns as specific as possible: a fixed prefix (like
EMP-ormongodb://) greatly reduces false positives. -
Always test a new pattern against real-looking sample data before relying on it.
Who can access the Security Scanner View?
Access to the Security Scanner View is controlled at the group level in the app’s Permissions settings.
It is possible to define which user groups are allowed to view Security Scanner results and access sensitive data detection (PII & DLP findings)
For more details, see: Permissions for Working With Issue History
Questions & Answers
3. How Security Scanner in Issue History for Jira app gets the data?
Security Scanner in Issue History for Jira app reads Jira work item data at runtime directly from Jira.
-
Data is processed inside Atlassian Cloud infrastructure
-
Jira remains the single source of truth for all work item data
-
The app doesn't write data back into Jira databases
-
The app doesn't store, copy, or persist Jira work item data in an external database

Issue History for Jira reads the full work item history on the fly, analyzes it, formats the results, and displays them to the user.
Haven't used Issue History for Jira app yet? 👉 Then you’re welcome to try it 🚀