
Note: We’ve updated the app’s Permissions page. Detailed information about the new permissions is available on this page. To access the updated experience, please upgrade to version 10.15.0 or later.
Why do you need permissions? This option allows you to restrict/grant access to the app features for certain user groups.
You can set permissions for:
-
Access to the app's Permissions page.
-
Access to all app views.
-
Access to Security Scanner View.
-
Access to “Deleted Work Items” option.
-
Access to export reports.
How to configure permissions
To manage access:
-
Open the app’s main page.
-
Click More (⋮) in the top-right corner.
-
Select Permissions.

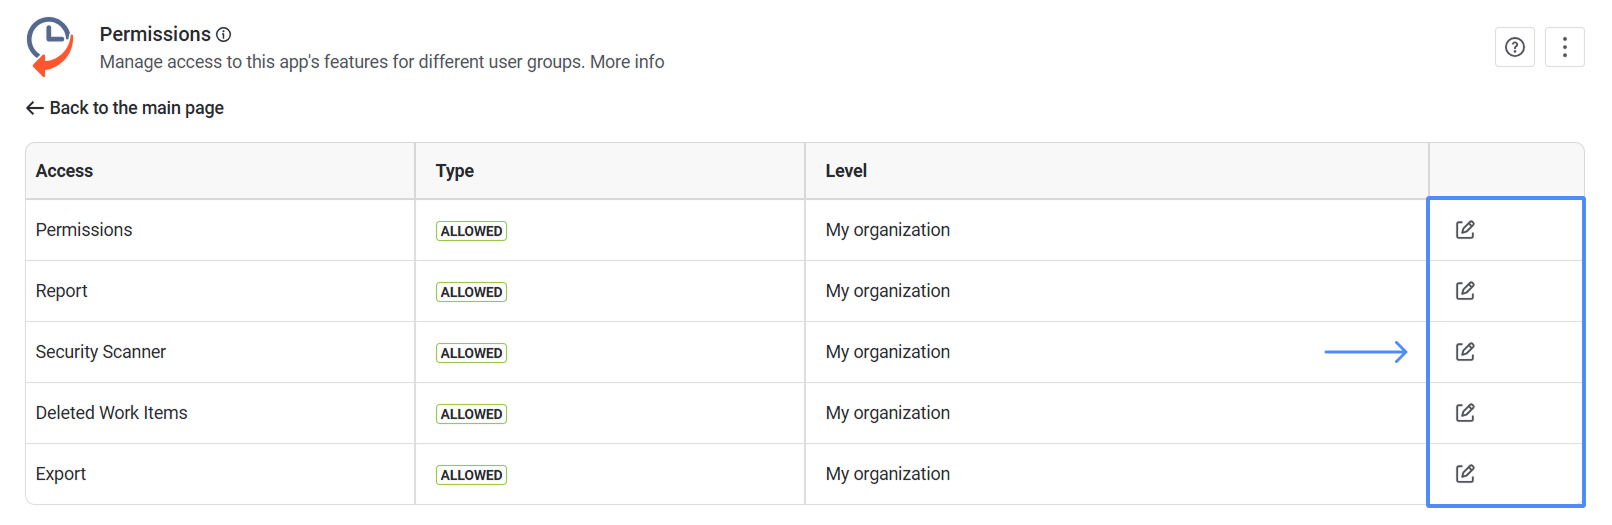
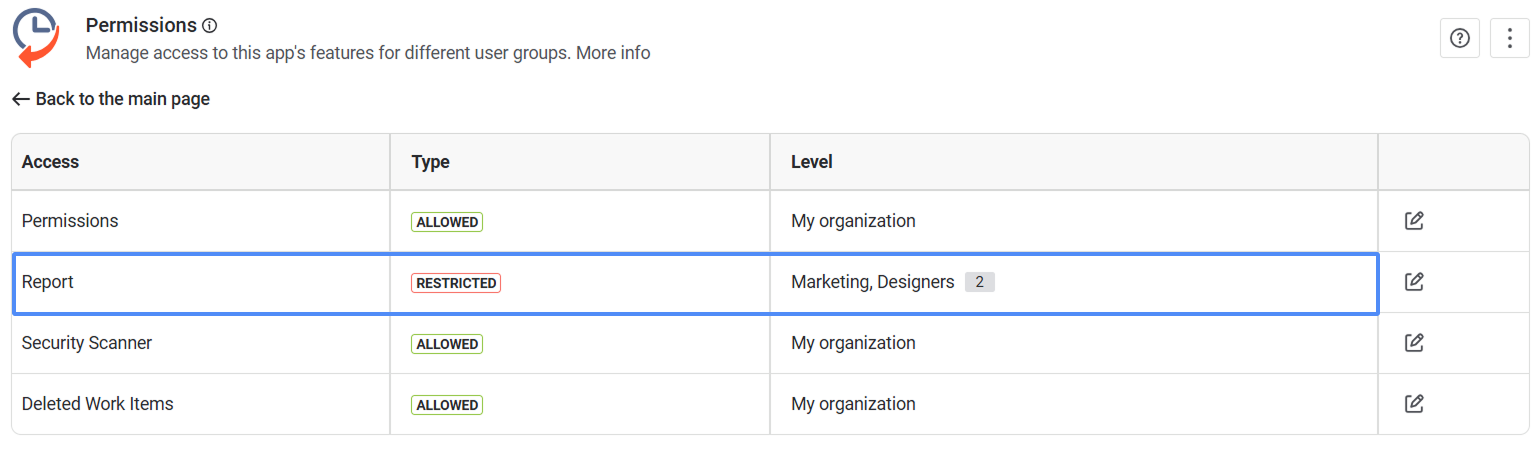
You’ll see a list of all app sections where permissions can be configured. You can change access for the following sections: Permissions, Report, Security Scanner, Deleted Work Items, and Export.
.png?cb=aced9e800a9d3c4cc5dba9468c797a83)
In the Permissions section, you can manage who has access to the app's Permissions page. A user from a group with Permissions menu restrictions will not be able to access this page.
In the Report section, you allow/restrict permissions to see all app views (except Issue History Panel View and Permissions page). If users in a group do not have permission to access the app’s views, they will see a message indicating they cannot access the reports.
In the Security Scanner section, you can control which user groups can see Security Scanner View results and access sensitive data detection (PII & DLP findings).
The Deleted Work Item section allows you to control the activation and display of data for deleted work items. If users from a group do not have access to the "Deleted Work Items” option, they cannot activate the toggle and view deleted tasks.

The Export section allows you to control which user groups can export work item data. If users from a group do not have permission to export, they will not be able to initiate exports.
Note that administrative groups (org-admins) have all rights by default and therefore cannot be disabled.
How permissions work
Each section has its own access rules.
Access levels:
-
My organization - all users have access.
-
User group - only selected groups are restricted or have access.
When using User group, you can choose:
-
Allowed - only selected groups have access.
-
Restricted - all users have access except selected groups.
How to set access
-
Click Edit next to the needed section.
-
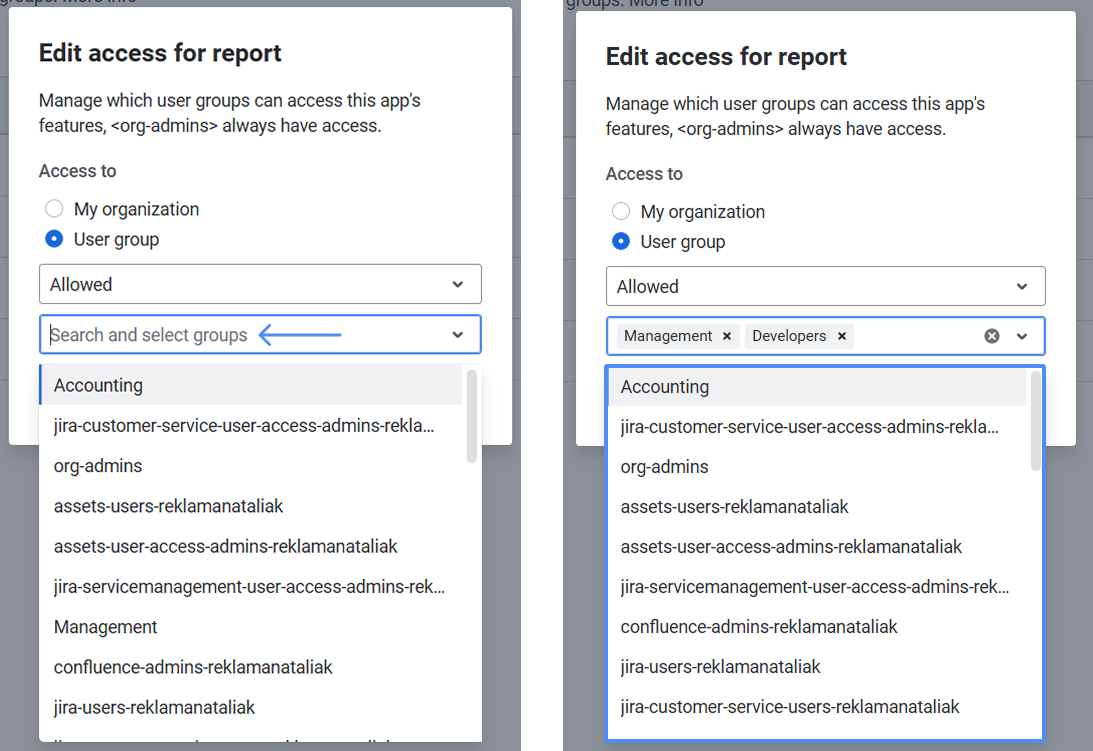
Select My organization or User group.
.png?cb=181e7dfa7e94161b87ec958c6ce5d87d)
-
In case of selecting User group, choose Allowed or Restricted.
.png?cb=f0b0afe3ef3d9ca93eb730418f546faf)
-
Then, select one or more groups.
-
Click Save. Changes apply immediately.
Note: Users in restricted groups will not see the feature and will not be able to use it. Admins (org-admins) always have full access
Understanding Type and Level Columns
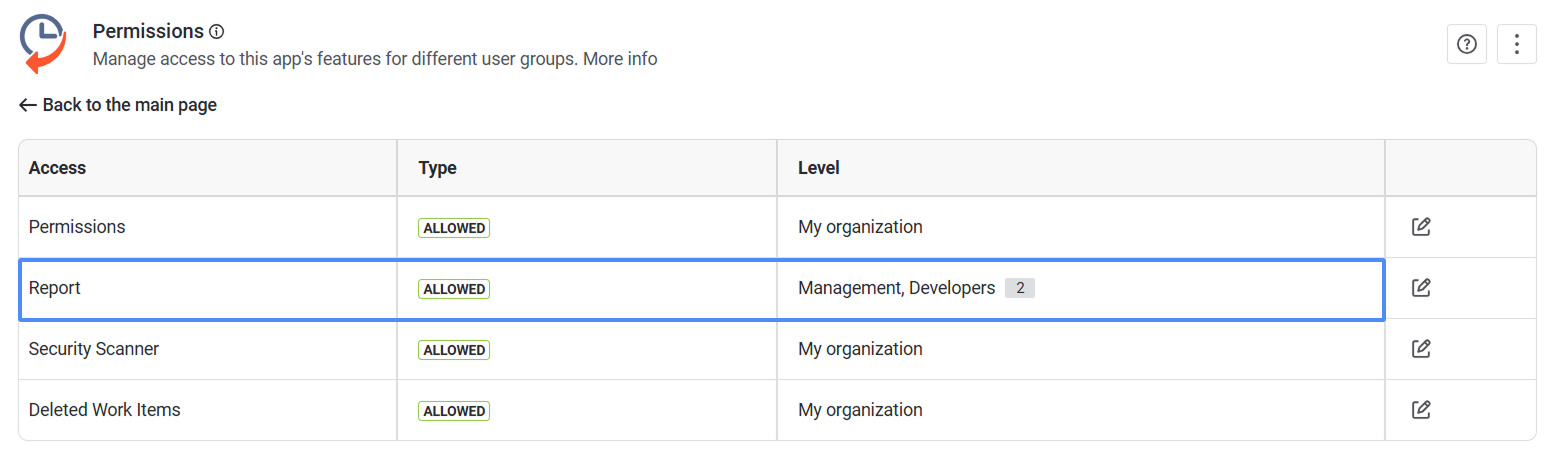
In the Permissions table, Type and Level work together to define access.
The Type column defines the access mode (Allowed or Restricted).
The Level column shows who this rule applies to.
Example 1: In the Report section, the Type: Allowed and Level: Management, Developers. That means only these groups have access; everyone else cannot see all app’s views (except Issue History Panel View and Permissions page).
Example 2: In the Report section, the Type: Restricted and Level: Marketing, Designers. That means that these groups do not have access to see all app’s views (except Issue History Panel View and Permissions page). Everyone else has access to all app’s views.
Example 3: In the Report section, the Type: Allowed and Level: My organization. That means all users in Jira can see all app’s views.
.png?cb=7502516f5350db0b35fc33cee36e316d)
Permissions Page in Versions Prior to 10.15.0
Why do you need permissions? This option allows you to restrict/grant access to the app features for certain user groups.
You can set permissions for:
-
Access to the Main dashboard of reports.
-
Access to Security Scanner View.
-
Access to deleted work items
-
Access to the management system itself for Jira user groups.
How to configure permissions
Open the app’s main page, click the More (⋮) menu in the top-right corner, and select Permissions (if you have administrator access) to manage access.
On the left side, you will see a list of your Jira user groups that have access to certain sections of the app.
.png?cb=b6301b2b7a2a83b75d026854c85977a8)
Note that administrative groups (org-admins) have all rights by default, so they cannot be disabled.
You can change access for four different sections: Report, Security Scanner, Deleted Work Items, and Permissions. By clicking on the checkbox near the column’s header, you grant or restrict permissions for all groups. Or you can do it separately for each user group.
.png?cb=432d14a453337af3744a5fafe6e0d087)
After selecting the groups that should have access, click Save changes.
Report section
In the report section, you grant/restrict permissions to see the main work item history report.
.png?cb=7cd2713d991c46839b3d9f1db46bc062)
If users in a group do not have permission to access the app’s main page, they will see a message indicating they do not have access to the reports.
Security Scanner section
This section lets you control which user groups can view Security Scanner results and access sensitive data detection (PII & DLP findings).
.png?cb=ae3e25ea03233efeeb4d05bb64f8cfec)
Deleted Work Items section
This section allows you to control the activation and display of data for deleted work items.
.png?cb=31895b789fe54385eecc3f07559490c1)
The "Deleted Work Items” option is available in the table header on the main page or in the menu.
If users from a group do not have access to the "Deleted Work Items” option, they cannot activate the toggle and view deleted tasks on the main page.
Permissions section
Here you can manage who has access to the Access Control section at the Jira group level.
.png?cb=015acb9dfce8ffbc8f20ab8d627df84c)
A user from a group with Permissions menu restrictions will not be able to access this section.
If you do not have access to a section, contact the administrator for help.
Haven't used this app yet? 👉 You’re welcome to try it now 🚀