
Issue History Panel View for Confluence allows you to add and see a Jira work item’s change history directly inside a Confluence page using the Work item activity macro.
This feature helps centralize documentation and change tracking in one place without switching between Jira and Confluence.
With the Work item activity macro, you can:
-
Display the full change history of a selected Jira work item
-
See who changed what and when
-
Track field updates, status transitions, and other modifications
-
Provide audit visibility directly within documentation pages
Note: Issue History Panel View for Confluence is available during the trial period and included in the Advanced plan of Issue History for Jira app. After the trial ends, it is available only in the Advanced plan.
You can try the Advanced plan for 30 days free or upgrade at any time.
How does it work?
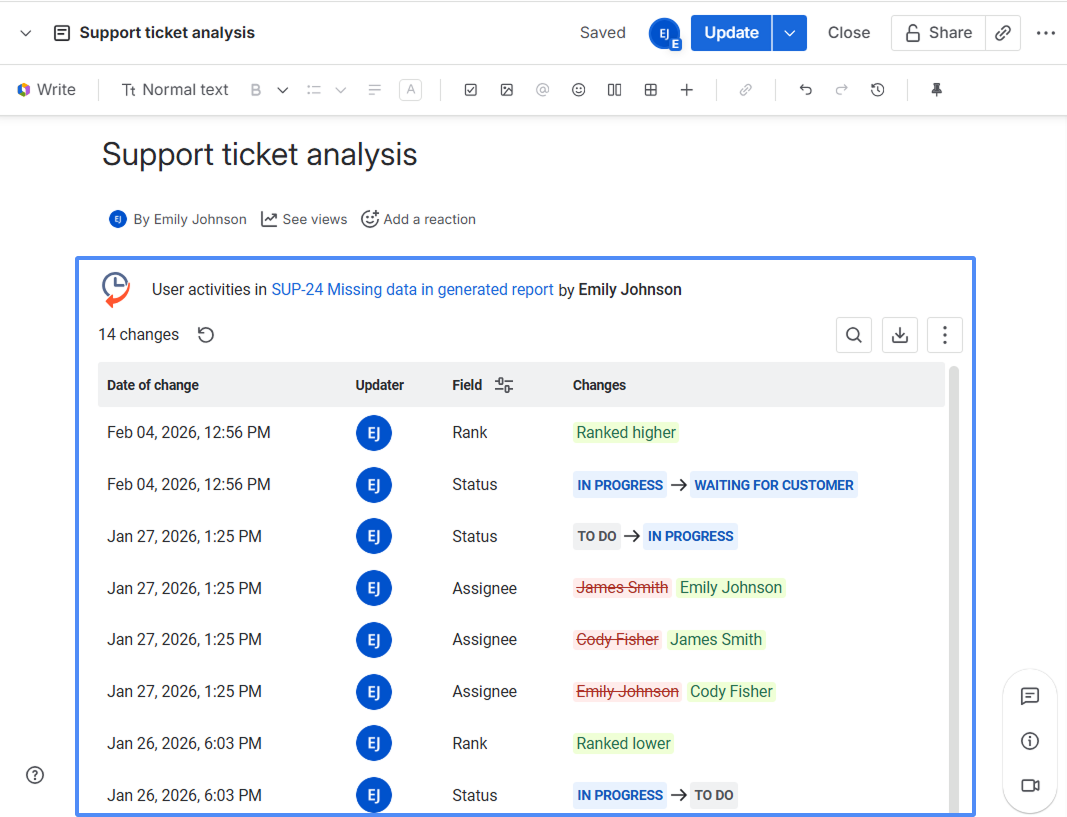
The macro retrieves change data directly from Jira and displays it on your Confluence page. All information is shown in chronological order and updates automatically based on the latest Jira data.
How to add the Work item activity (by Issue History) macro?
-
Open your Jira, go to the Apps menu, and select Manage apps.
.png?cb=a9483679a8d380630c8847ed1de68ea7)
-
Click the Take me there button.
.png?cb=499a219b578ebee9328405c0262dd32f)
-
In the Connected apps (Installed apps) section, find the Issue History for Jira (Work Item History) app.
.png?cb=ca2f7c14d54c2032a63e9c80e4763d95)
-
Click View app details.
.png?cb=cdda6f2485cc053ac4e594456f7074a3)
-
Then click the Manage connections button.
.png?cb=70f7ded6ddcdc14e98b1dcbfcafdaf71)
-
Next to Confluence, click Connect.
.png?cb=48bd73fc32b70f32187c0e078ff0bff8)
-
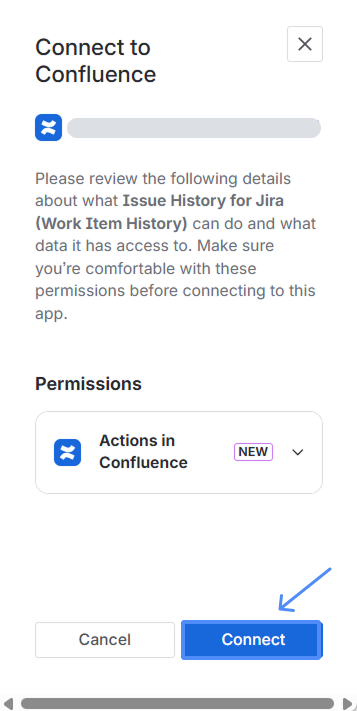
In the window that appears, click Connect again to confirm.
-
If the connection is successful, you will see the status “Connected” next to Confluence.
.png?cb=0239d3c9bea6e2168a4a7834c11403b1)
-
You can now navigate to Confluence. You can do this via the Switch sites or apps menu in Jira.
.png?cb=746a5563f70dc149850e1cd424da88da)
-
Open the Confluence page where you want to display the work item history and click Edit.
.png?cb=0c2475422f4ca608974c6a9e1c3ae163)
-
Type
/on the page and search for Work item activity (by Issue History). Select the macro from the list.
.png?cb=886902ffd5459077e2918c05745fdcf9)
-
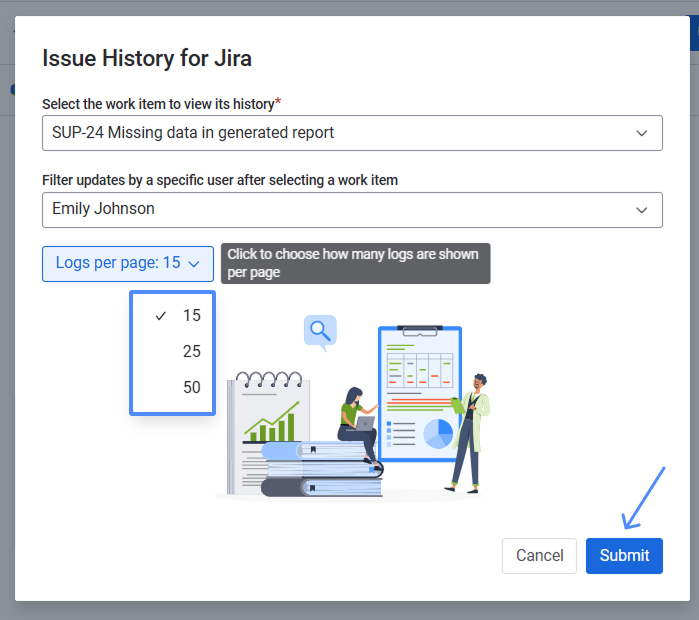
In the configuration window that appears, select the work item whose history you want to display.
.png?cb=f0a520503c0b48cea34fac6501710204)
-
You can filter updates by a specific user or view changes made by any user.
.png?cb=bbaf1c94edf9f1355e34ca12d87c1d39)
-
Choose how many logs to display per page (15, 25, or 50), then click Submit.
-
The macro will automatically load the full change history for the selected work item.
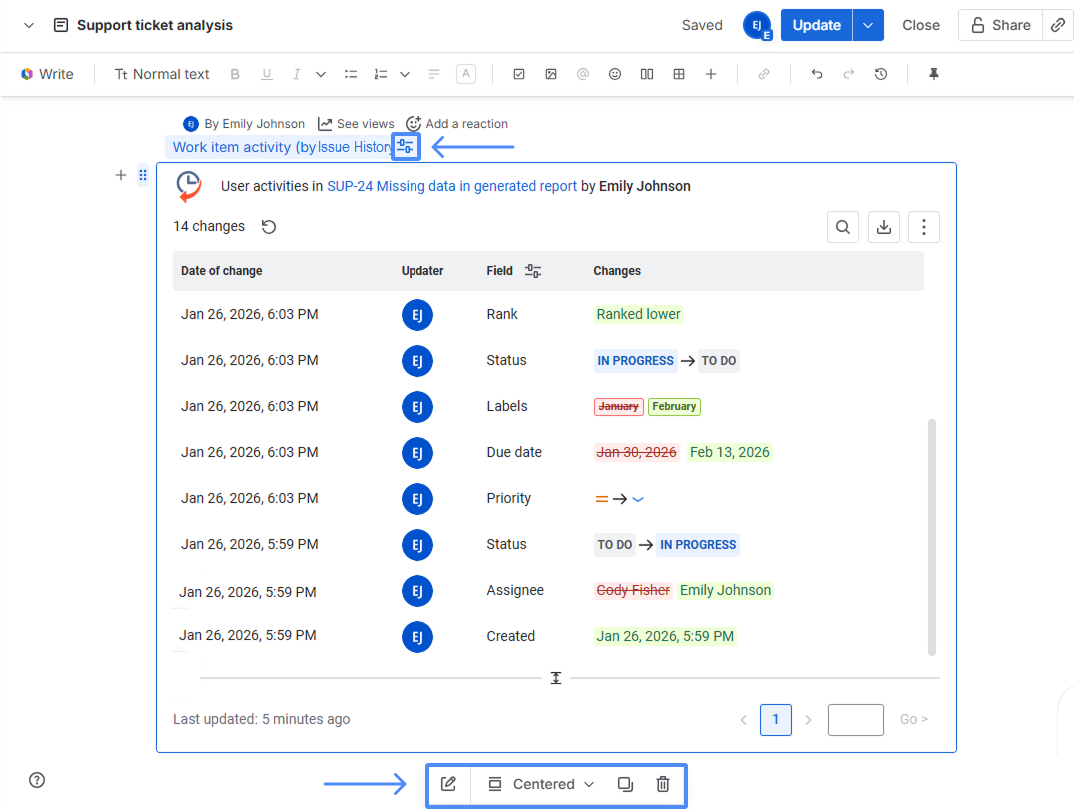
How to edit or delete the macro?
To edit, copy, or delete the macro, move your cursor to the top-left corner of the macro and click the Configuration icon.
A menu will appear below, where you can edit settings, duplicate the macro, or remove it from the page.
What to do if the work item is unavailable?
If the work item was deleted or is no longer accessible, you will see a notification. To update the selection:
-
Move your cursor to the top-left corner of the macro and click Configuration, and select Edit from the bottom menu.
.png?cb=a10c7a64ad6de814be25caad63f57649)
-
Choose another work item and save.
Haven't used Issue History for Jira app yet? 👉 Then you’re welcome to try it 🚀