
You can arrange the report the way you need with the settings below.
1. Filter Work Items
Select one of the following options to get the list of work items for:
-
Assignee - select a specific user, or choose Unassigned to include work items with no assignee
-
Filter - use a previously created and saved Jira filter
-
Label - include work items with a specific label
-
Space - select work items from a specific space
-
Reporter - include work items created by a specific user
-
Sprint - select work items from a specific sprint
-
JQL - define a custom query using Jira Query Language
-
Deleted work items - include work items that were deleted but are still available in historical data
.png?cb=06fc9d073b72dda914121ea35199cf05)
“Updated by” menu with single + multi-select users
Also, you can filter work items by the user (s) who made updates.
Select one user:
.png?cb=0d0909a04c1cffe889c1f9398bd68b33)
Or multiple users:
.png?cb=3991227a1c2ea74f4af4cc39076f0e9e)
To sort the changelog, click on a column header.
2. Choose the Date Range
Use the Date range functionality to customize report timeframes.
You can select the time period you want to get the report based on:
.png?cb=5bf1502875a5f40fb02d552b065ce21b)
It can be a given period (today, yesterday, last week, this month, etc.), or you can select/enter the custom time duration (Start&End dates).
.png?cb=4185e4906d87a609f86afc88e80a36aa)
3. Column Manager
You can add custom and standard fields to the grid using the Columns menu to manipulate output data.
Date, Work Item Key, and Updated by fields are chosen by default. You can add additional fields (e.g., Status, Assignee, Description, etc.) as needed.
.png?cb=72c7a609c647f0d6e2b1888c0bf63f3e)
Active fields (1) show which work item fields are included in the report and all changes for them.
Updated fields (2) are all other work item fields you can include in the table and get changes for them.
The number in the right corner shows how many changes were made to each field.
.png?cb=f5df0f54b0ccf3e6ef7f4a258ceb7f3e)
Drag and drop each field to set their layout order in the table. The upper field appears first after the predefined columns.
.png?cb=69d0f78154361ab7b00eca95d7040b9e)
Changes grouped for each work item
-
Click any column header to sort it, and you will see the task's changes grouped.
-
Click the drop-down arrow to expand/collapse the updates.
.png?cb=95cd330819982dc158929ec5f2dd6eb6)
If you want to return sorting only by date, exclude all other options from the sorting (e.g., work item key, status, priority, etc.)
.png?cb=f49765cca58b433a9df9f2dabd754f94)
Read more about Group changes by issue key
Switch ON/OFF the highlighted view
Focus attention only on rows where changes were made. Click the button to switch ON/OFF the highlighted changes:
Navigator for the wide table
If you have added many fields and columns to track, the width of the change table will expand. Our navigator allows you to see where you are and quickly scroll to the desired field where the changes were.
.png?cb=632acf2df8401d594ddae78163f1fea3)
Work item history report
After the previous settings, you will receive a report showing the changes made to the work items you need to see. The main report grid displays the data according to the default and custom columns you selected before in the column manager.
.png?cb=f4cd563e6c6f2d5951f0dee2c1f49d80)
Created and Latest indicators
Created shows when a work item was originally created.
.png?cb=30546393c704803eb31842322d936f3e)
Latest highlights the most recent change and appears only if it happened within the selected date range, and when the last modified field and its updater are included in the report.
.png?cb=5bf2f90257ea08b18d5bb14fb13af662)
User activity report
There are two options to view the activity of a particular user.
-
Use the Updated by menu, type in the name, or select the person you need from the drop-down list.
-
Choose the user directly from the table. Hover the cursor over a specific person’s name, and you will see a user card. Click “Show user activity”.
.png?cb=fc693b673d623c96690ba6ca6f75c7e5)
Group-based filtering
You can also filter changes by user groups to quickly see all updates made by a specific team. Select a group once and review their activity without manually choosing individual users.
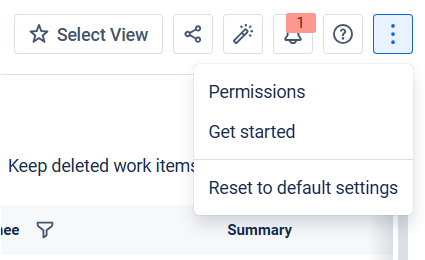
Reset to default setting
Reset to default settings feature lets you quickly return the app to its original state.
Use it when your view becomes overloaded with filters, custom columns, or sorting rules, and you want a clean start.
To reset the app to its default settings, click More (⋮) → Reset to default settings.
Then, confirm the action by clicking Reset button in the window that appears.
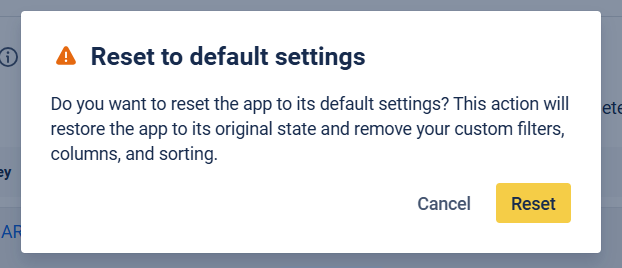
All custom filters, columns, and sorting will be reset.
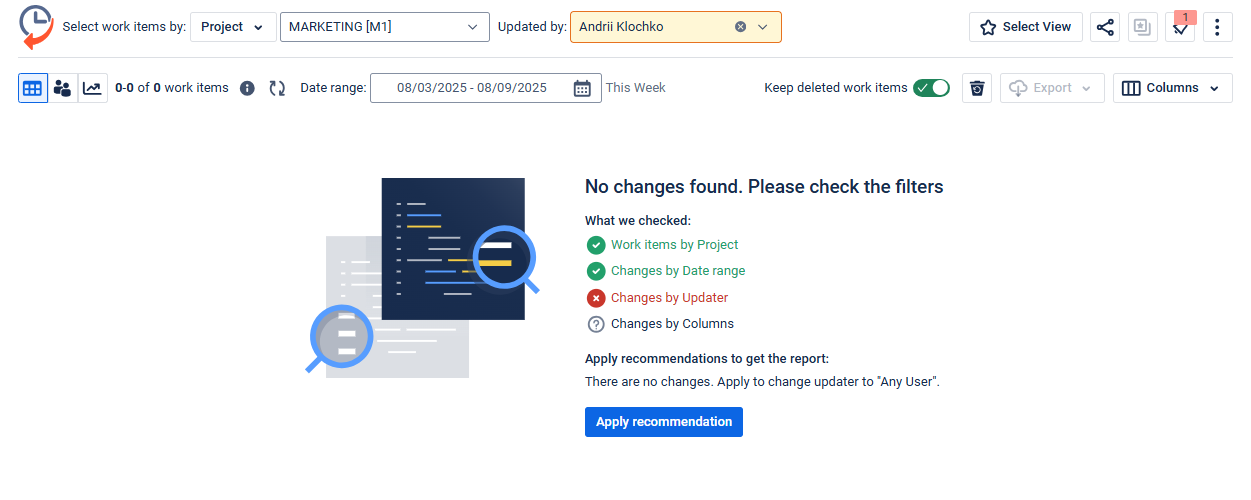
Empty State Troubleshooter
When no changes are found in your report, it usually means the filter conditions don’t match any data. That’s where the Empty State Troubleshooter comes in.
This built-in visual assistant automatically detects problems with your filters and guides you with helpful suggestions on how to adjust them. Whether it's a date range, user selection, or field mismatch, Troubleshooter will point out the problem so you can quickly get back to viewing your work item history.
Changes grouping
Follow the use cases if you’d like to select just one or several work items.
How to get issue history for the chosen issues only?
Haven't used this app yet? 👉 Then you’re welcome to try it 🚀