
Combine Jira fields and multiple workflow metrics in one customizable report.
Overview
Advanced reports let you analyse multiple workflow metrics alongside Jira fields in a single table. Use Filter to select work items, then add metrics such as time in status, status counts, status entrance date and transition count to compare different aspects of their workflow history without switching reports.
Before you begin
-
Edition: Advanced reports are available in the Advanced edition of Time in Status.
-
Where: The Time in Status app page in Jira. Advanced reports are not available in Time in Status dashboard gadgets or in the Time in Status Confluence macro.
-
Saved report access: Access to a saved advanced report is managed through its Viewer, Editor, and Owner roles. You need Editor or Owner access to save changes to the report.
-
Data access: The report includes only work items you have permission to view in Jira.
Build an advanced report
-
In Jira, open Time in Status and select Advanced reports in the sidebar, directly below Standard Reports. The report runs with the JQL
created >= -30d order by created DESC, the report period Any dates, and the columns Type, Work item key, Summary and Status. The first time a report finishes loading, a three-step tour introduces the JQL field, the report period control and the Columns control. -
In the JQL field, enter a query that selects the work items you want to analyze.
-
Select the range to analyze in Report period.
Add Jira fields and metrics
-
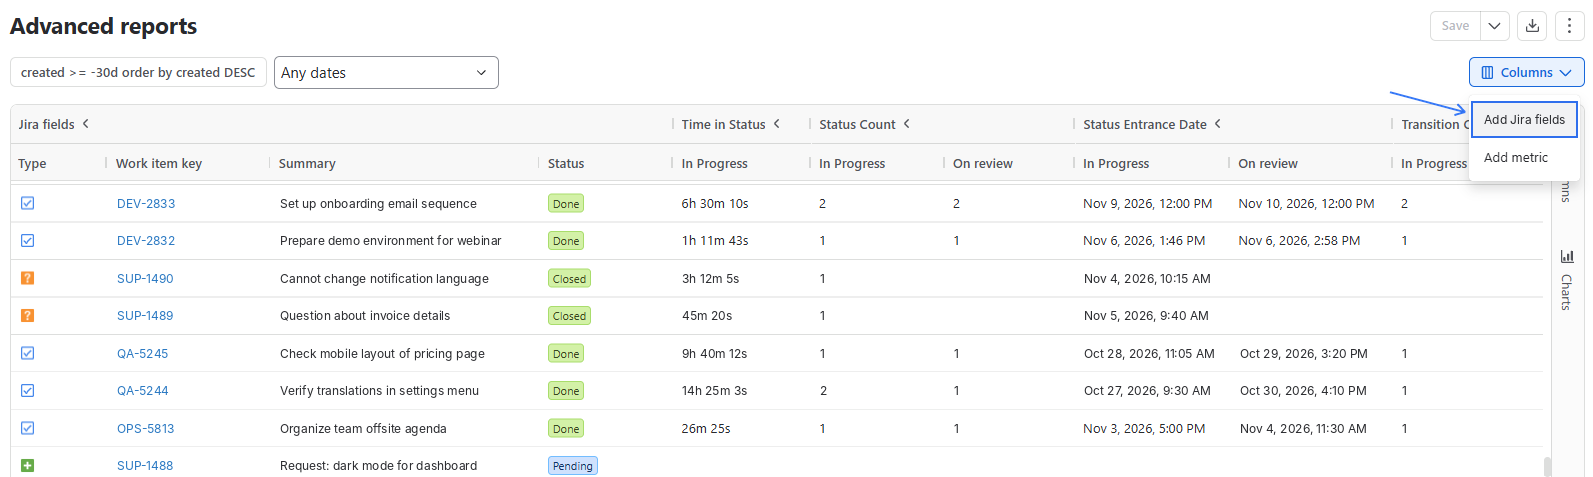
Select Columns > Add Jira fields.
-
Search for a field by name, then check the fields you want to add and clear the fields you want to remove.
-
Select Add.
Add a metric
-
Select Columns > Add metric.
-
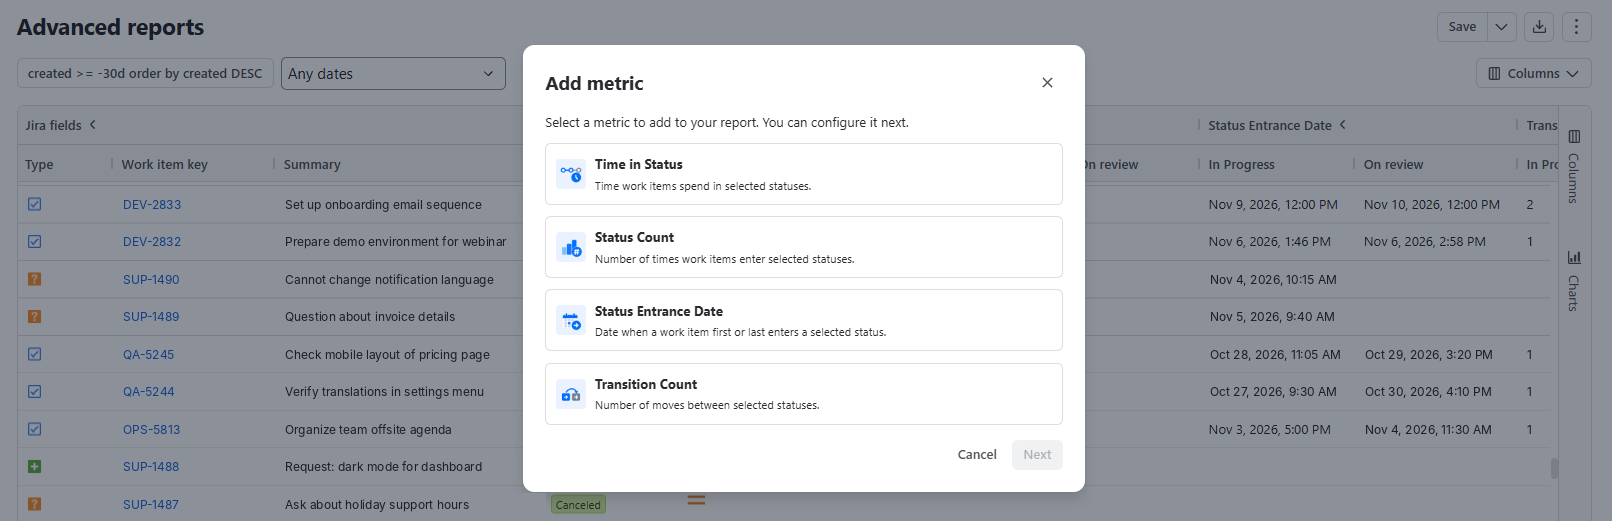
Select a metric, then select Next.
-
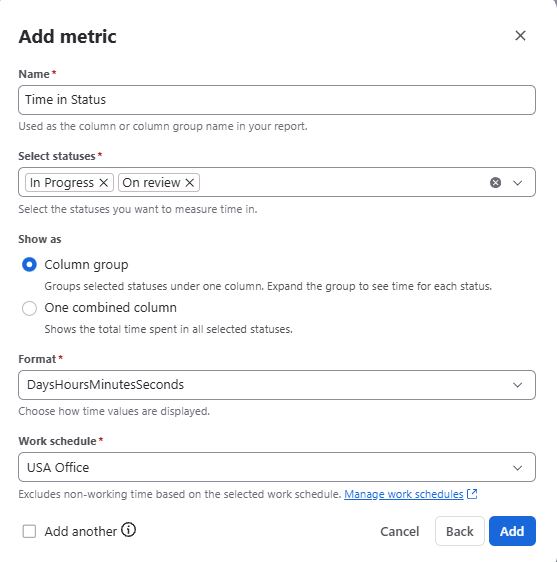
Optional: In Name, change the header the metric's columns appear under.
-
In Select statuses, select the statuses to measure.
-
Set the metric's options, then select Add.
Metrics and settings
|
Metric |
What it shows |
What to configure |
|---|---|---|
|
Time in Status |
Time work items spend in the selected statuses. |
Select statuses, Show as, Format, and Work schedule. |
|
Status Count |
How many times work items enter the selected statuses. |
Statuses to count and the available Show as options. |
|
Status Entrance Date |
When a work item first entered each selected status. |
Statuses whose entrance dates you want to display. |
|
Transition Count |
The number of moves between the selected statuses. |
Statuses/transitions to count and the available Show as options. |
-
Show as: Column group shows one column per status or transition under the metric's header; collapse the group to see the total. One combined column shows only the total for all selected statuses or transitions.
-
Format: Sets how time values are displayed.
-
Work schedule: Excludes non-working time based on the schedule you select. To create or change schedules, select Manage work schedules.
To change a metric later, open the menu of one of its columns and select Edit metric.
Analyze report data
Use grouping, aggregation, Pivot mode, charts, and column filters to analyze the configured report. For instructions and a comparison of availability across report pages, see Report features and availability.
Save and share a report
-
Select Save.
-
Enter a Report name of up to 255 characters and, optionally, a Description.
-
Under Viewers and Editor, add the people who can open or change the report. With no viewers, the report is Private.
-
Select Save.
To share the report, send its URL.
|
Role |
What you can do |
|---|---|
|
Viewer |
Open the report. Select Save as to keep your own copy. |
|
Editor |
Save changes. |
The person who saves a report is its Owner. To share a saved report, send its URL to someone who has access to it. Sending the URL does not grant access.
To find a saved report later, open Saved reports in the Time in Status sidebar and select the Advanced reports tab. To change its name, description, viewers or editors, use the menu in its Actions column.
Limitations
-
Time in Assignee, Average Time and Time in Status per Date are not available as metrics.
-
You cannot remove the Work item key column.
-
Metric columns can be used in Values, but cannot be used in Row Groups.
-
Existing saved reports and presets from Standard reports cannot be turned into advanced reports.
-
Advanced reports are not available in dashboard gadgets or the Confluence macro.
-
Ownership of a saved advanced report cannot be transferred.
If you need help or want to ask questions, please contact SaaSJet Support or email us at support@saasjet.atlassian.net
Haven't used this app yet? Try it now!