
Customer Problem
“We create issues automatically and preset field values.
I want those values to appear on the form when the user opens it.
And I want to share the form by email automatically — without manually saving drafts.”
Customers want to avoid:
-
Manual form preparation
-
Saving drafts before sharing
-
Asking users to re-enter data already stored in Jira
Smart Forms + Jira Automation solve this completely.
Possible Use Cases
This setup is ideal for:
-
✅ Approval workflows (dates, budgets, contracts)
-
✅ Customer confirmation forms
-
✅ CSAT / NPS surveys after ticket resolution
-
✅ Incident validation forms
-
✅ Change request approvals
-
✅ External stakeholder reviews
-
✅ HR onboarding confirmations
-
✅ Simple customer portal scenarios
How It Works
-
A Jira issue is created or updated (manually or automatically).
-
Required Jira fields (Summary, Description, Custom fields, etc.) are already filled.
-
Jira Automation sends an email with the Smart Forms external URL.
-
The URL includes parameters with Jira field values.
-
Smart Forms detects matching placeholders (e.g.,
{summary}). -
The form opens with fields automatically pre-filled.
No drafts. No manual edits. Fully automated.
Key Benefits
-
🚀 Eliminates manual form preparation
-
🔄 Transfers Jira data automatically into forms
-
📩 Sends personalized forms via email
-
🔐 Works securely with encoded parameters
-
🧩 Supports standard and custom Jira fields
-
⚙ Fully automated workflow
Example Setup
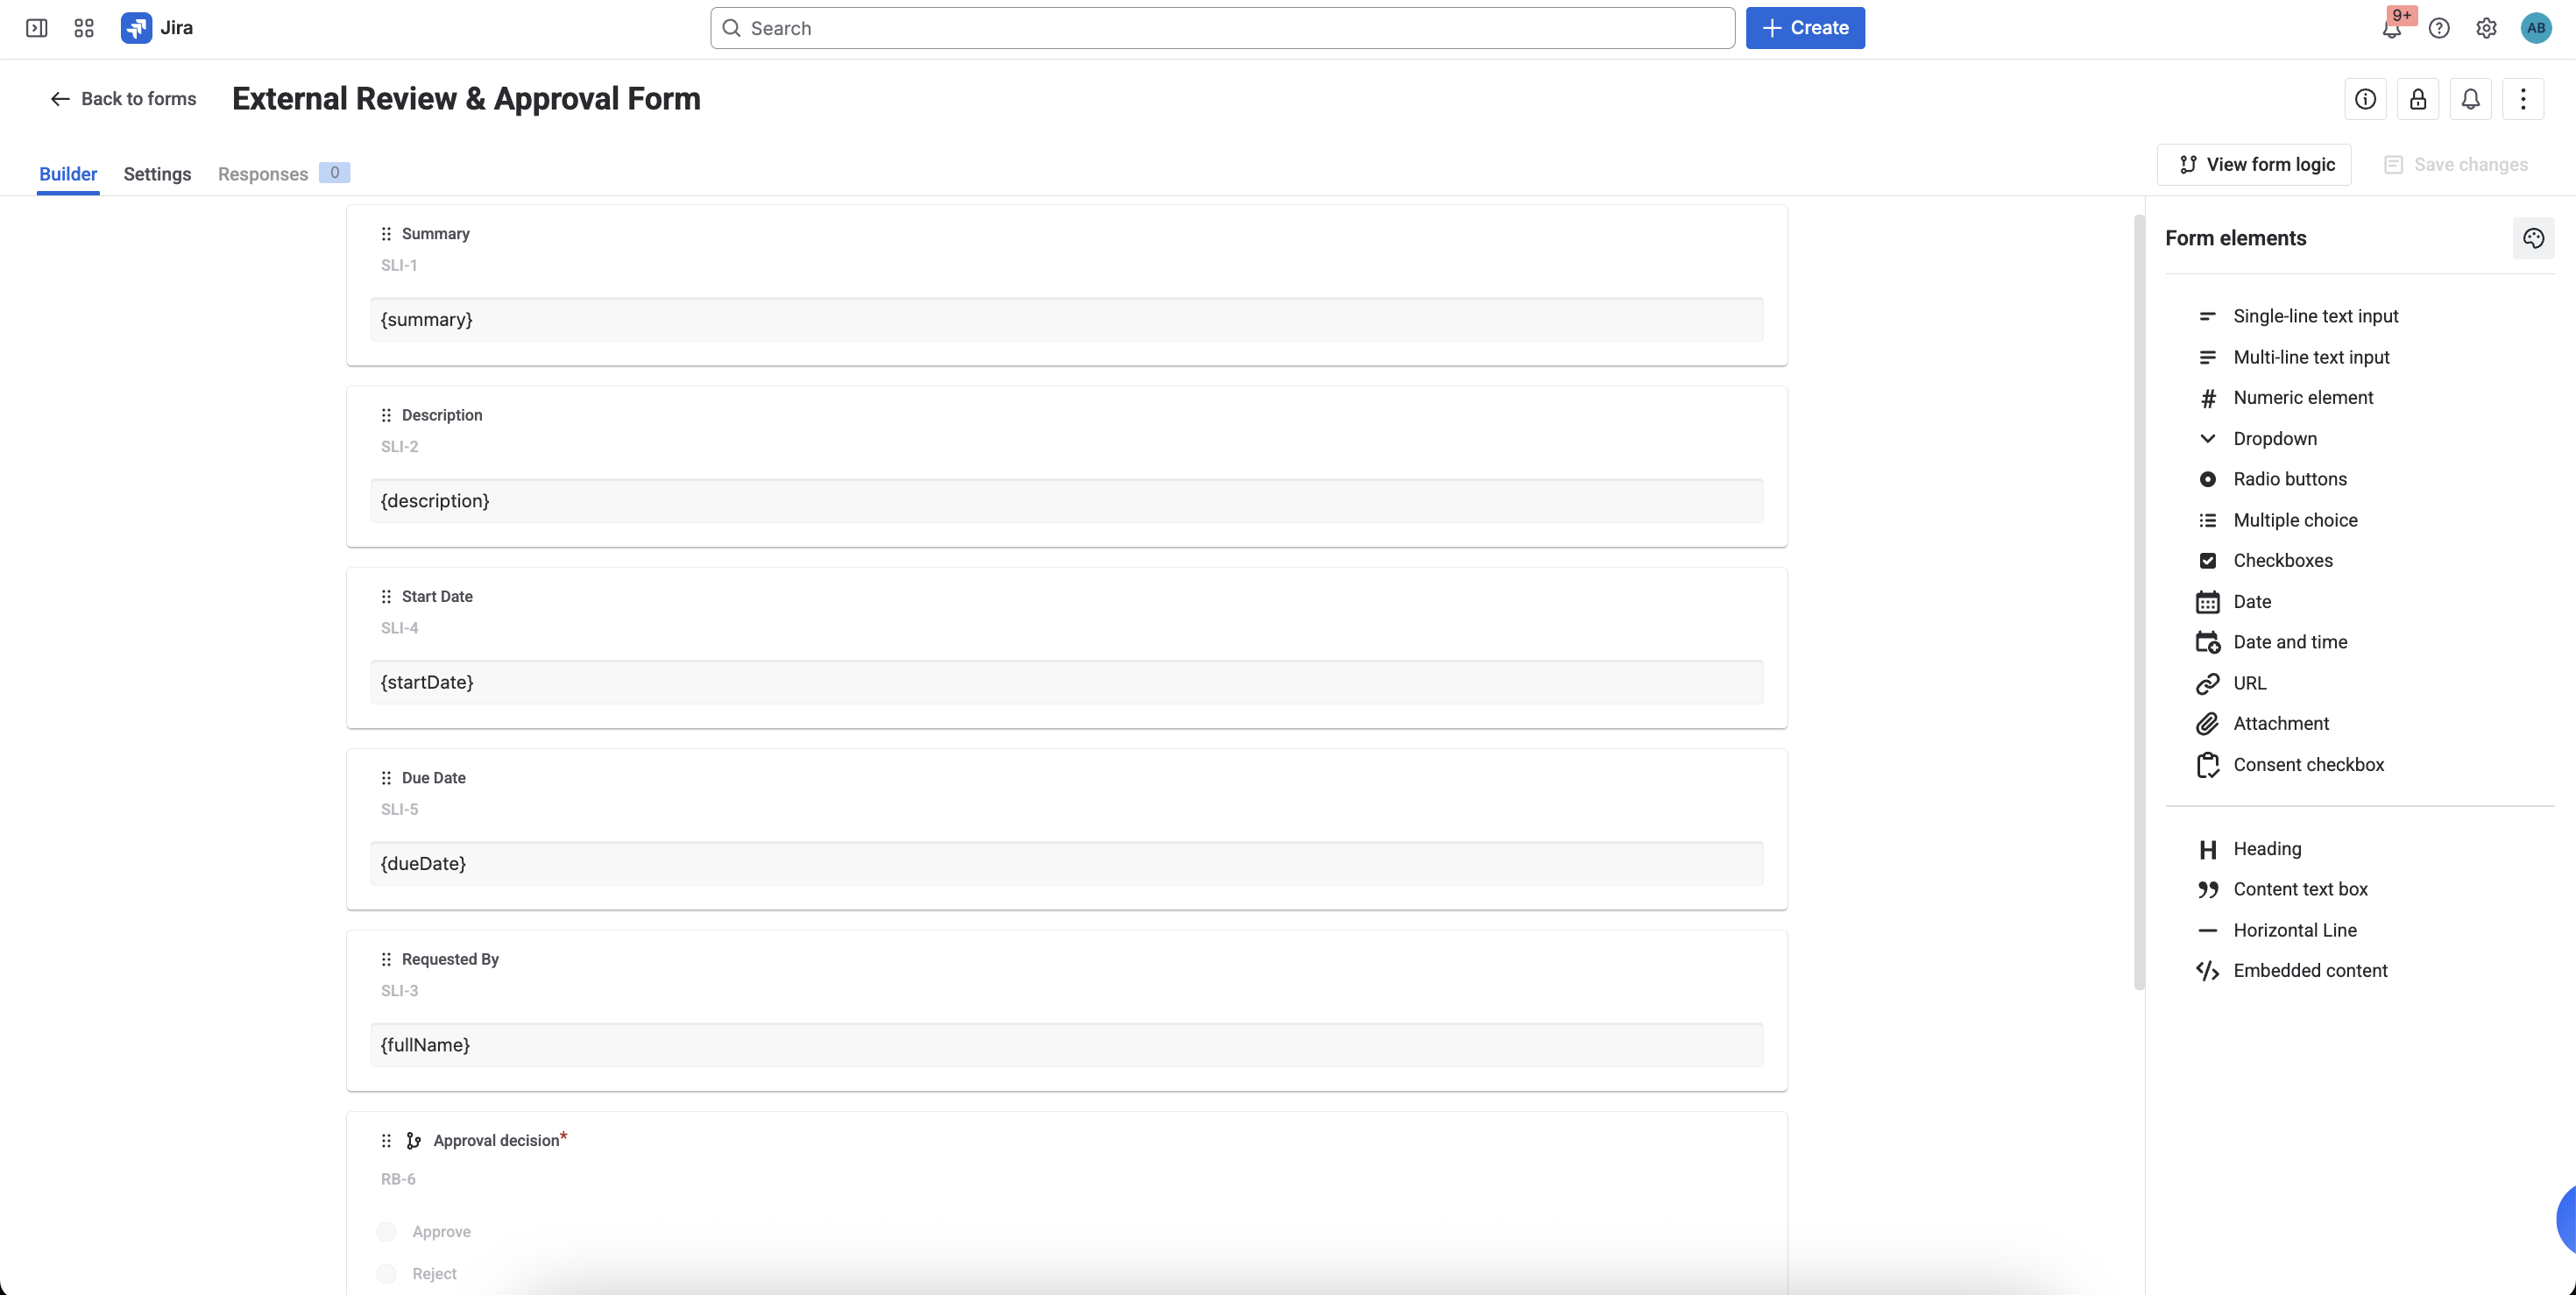
Step 1: Configure the form in Smart Forms
-
Create a form in the Smart Forms app.
-
For each field that should receive Jira data:
-
Open the field settings.
-
Set Default Response using a parameter placeholder.
-
Examples:
{summary}
{description}
{startDate}
{dueDate}
{fullName}
You can use any parameter name — just wrap it in { }.
Important:
-
Parameter names are case-sensitive.
-
The URL parameter must match the placeholder exactly.
-
If needed, these form elements can be hidden from the form preview.
Supported form elements for parameters:
-
Single-line text input
-
Multi-line text input
Step 2: Attach the form to Jira work item
Go to the Settings tab in Smart Forms.
You can enable the auto-attach form to work items, or attach the form manually to selected issues.
Optional features that allow Jira fields to be updated automatically based on form responses.
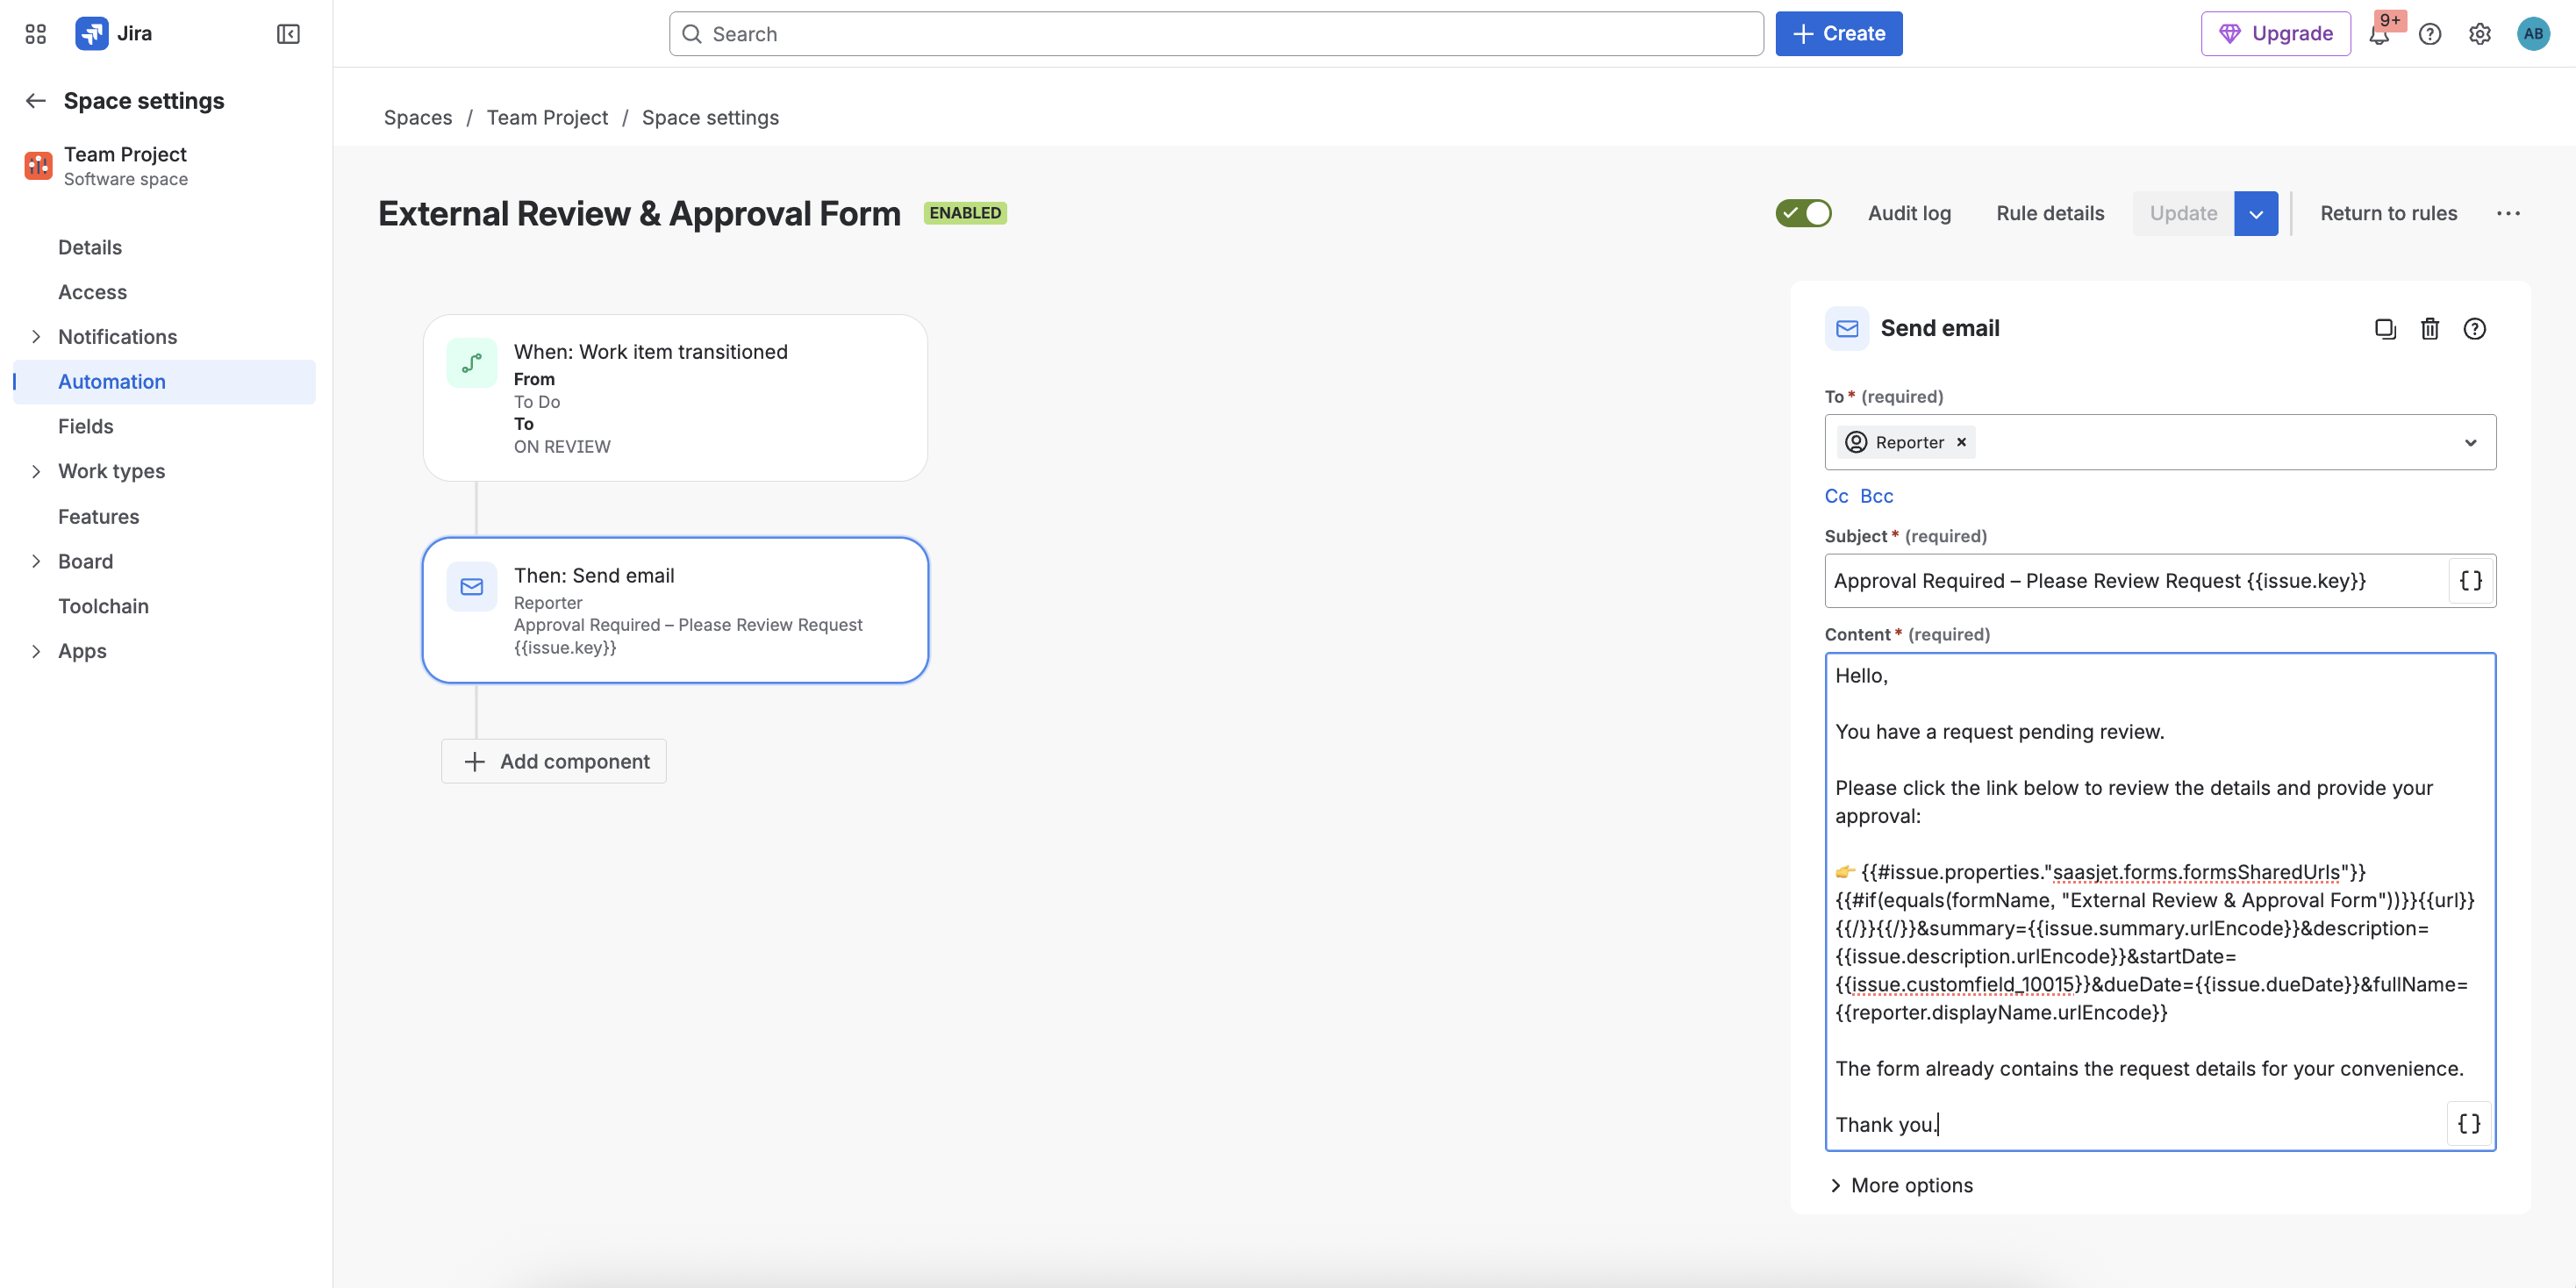
Step 3: Configure Jira Automation
Trigger
Example:
When: Issue transitions to On Review
(You can use any trigger: Issue Created, Field Updated, Scheduled, etc.)
Action: Send Email
Choose recipients:
-
Reporter
-
Assignee
-
Custom email field
-
Any external email address
Retrieve the External Form URL
Use this Smart Value in the email body:
{{#issue.properties."saasjet.forms.formsSharedUrls"}}
{{#if(equals(formName, "Your Form Name"))}}
{{url}}
{{/}}
{{/}}
Important:
-
Replace
"Your Form Name"with your exact form name. -
The name is case-sensitive.
Append Jira Field Parameters
After the Smart URL, add Jira field values as parameters.
Example:
{{#issue.properties."saasjet.forms.formsSharedUrls"}}
{{#if(equals(formName, "External Review & Approval Form"))}}
{{url}}
{{/}}
{{/}}
&summary={{issue.summary.urlEncode}}
&description={{issue.description.urlEncode}}
&startDate={{issue.customfield_10015}}
&dueDate={{issue.dueDate}}
&fullName={{reporter.displayName.urlEncode}}
Notes:
-
Always use
.urlEncodeto prevent broken links in text Jira fields. -
Parameter names must match form placeholders.
-
You can pass any Jira field, including custom fields.
Example custom field:
&customer={{issue.customfield_10421.urlEncode}}
Step 4: Save and Activate the Rule
Activate the automation rule.
The Result
When the issue transitions to On Review:
-
Jira automatically sends an email.
-
The external user clicks the form link.
-
The form opens with:
-
Summary, Description, Start date, Due date, Requested By pre-filled
-
-
The user completes only the remaining fields.
-
Upon submission, Smart Forms can automatically update fields or change status.
Fully automated end-to-end process.
Advanced Scenario: Simple Customer Portal
You can create a two-step automated flow:
-
A Smart Form on your website creates a Jira issue.
-
Jira Automation sends another Smart Form with pre-filled data.
-
The customer confirms, approves, or adds additional information.
This creates a lightweight customer portal experience without custom development.