
Using Form URLs in Jira Automation
Content: Overview › URL Generation › URL Management › Automation Integration
This feature enables you to automatically include a link to a Smart Form, placed within a Jira work item, into emails or other actions triggered by Automation for Jira. This creates a seamless workflow where users can receive a direct link to the form for completion or viewing, integrated directly into their automated communications.
🔗 Automatic URL Generation
Default Behavior:
-
URLs generate automatically when forms are added to work items (Auto & Manual Add)
-
:share_form_green: Green icon indicates active shared form
-
All forms (new and existing) have shareable URLs
📌 Important: Forms shared from issues are limited to one-time submissions only. Each shared URL allows only 1 response. To share with multiple users, you need to add multiple forms to the work item.
Security Settings:
-
Forms with user picker fields automatically set access to "Verified in instance"
-
Security flag appears in add-on after saving changes
-
No security flag shown directly in issues
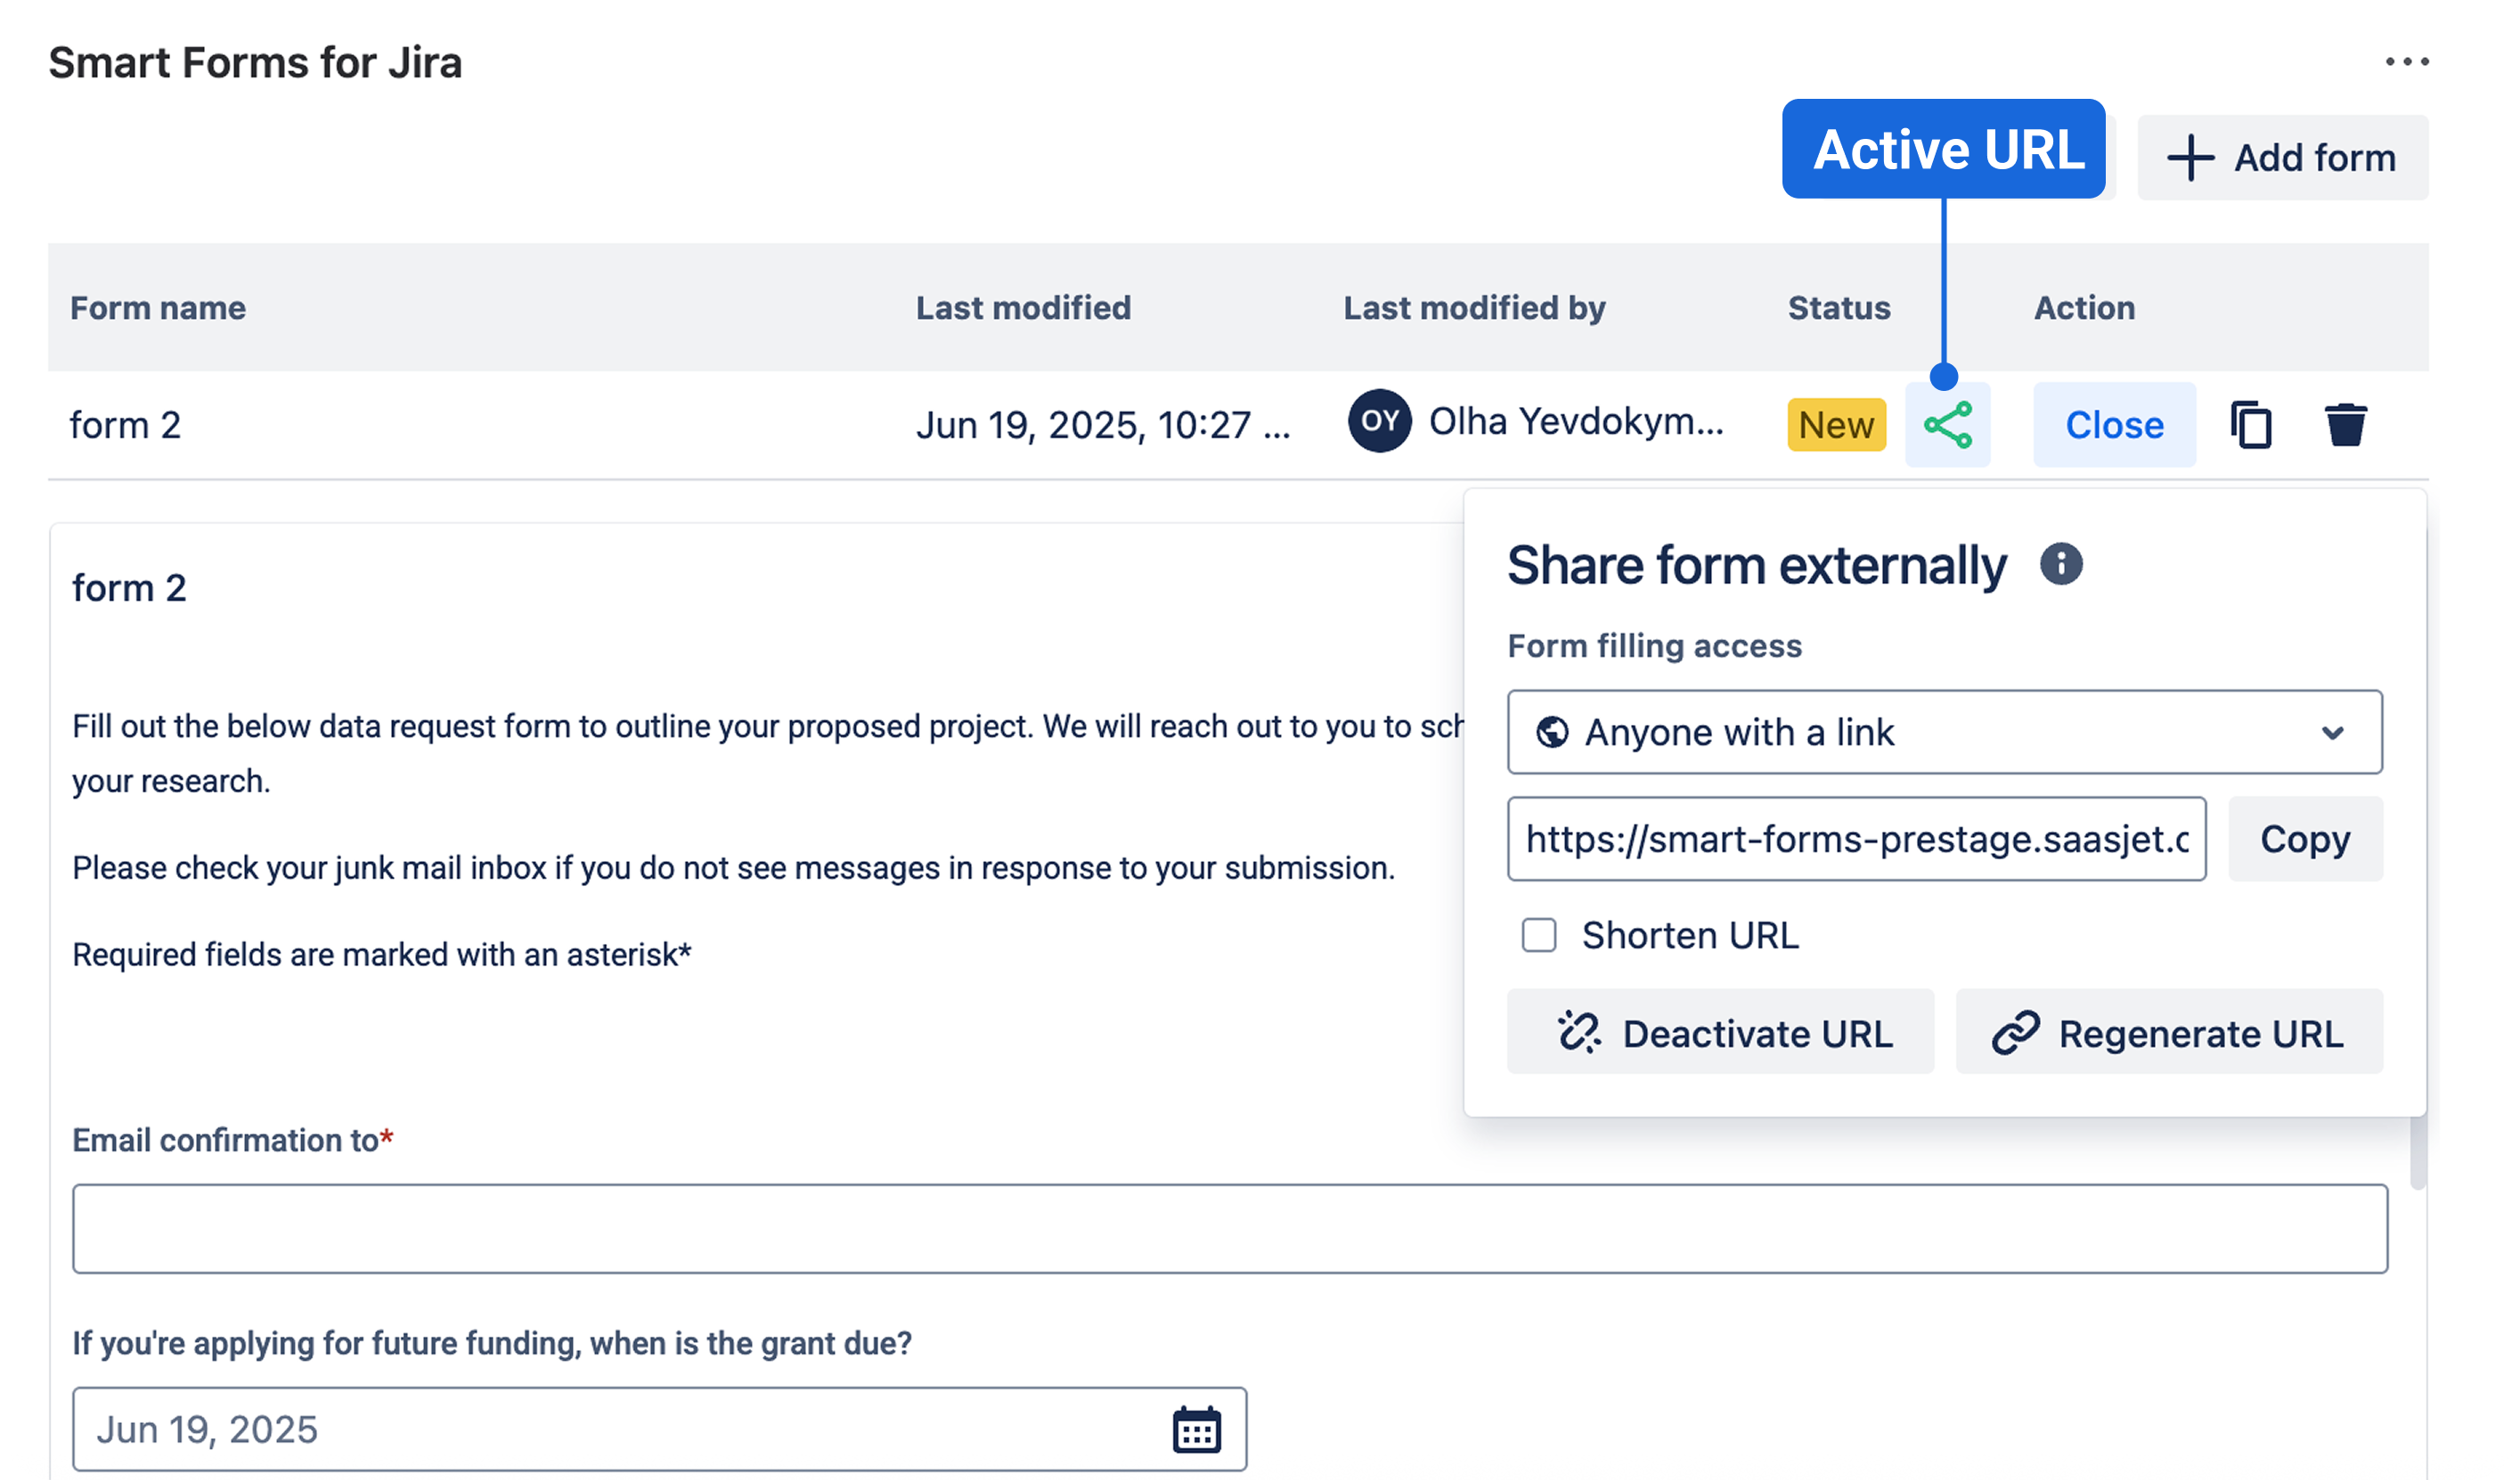
⚙️ URL Management
:share_form_green: Active State (Default)
-
Form accessible to external users
-
All sharing options enabled
-
Green icon in settings
:share_form_base: Deactivated State
-
Click Deactivate URL to disable access
-
:share_form_base: Grey icon indicates deactivated form
-
Form shows "URL expired" message to submitters
-
URL remains unchanged but becomes inaccessible
🔄 URL Regeneration
How It Works:
-
Click Regenerate URL button
-
Confirmation modal appears with warning
-
Current URL becomes permanently unavailable
-
New URL generates automatically
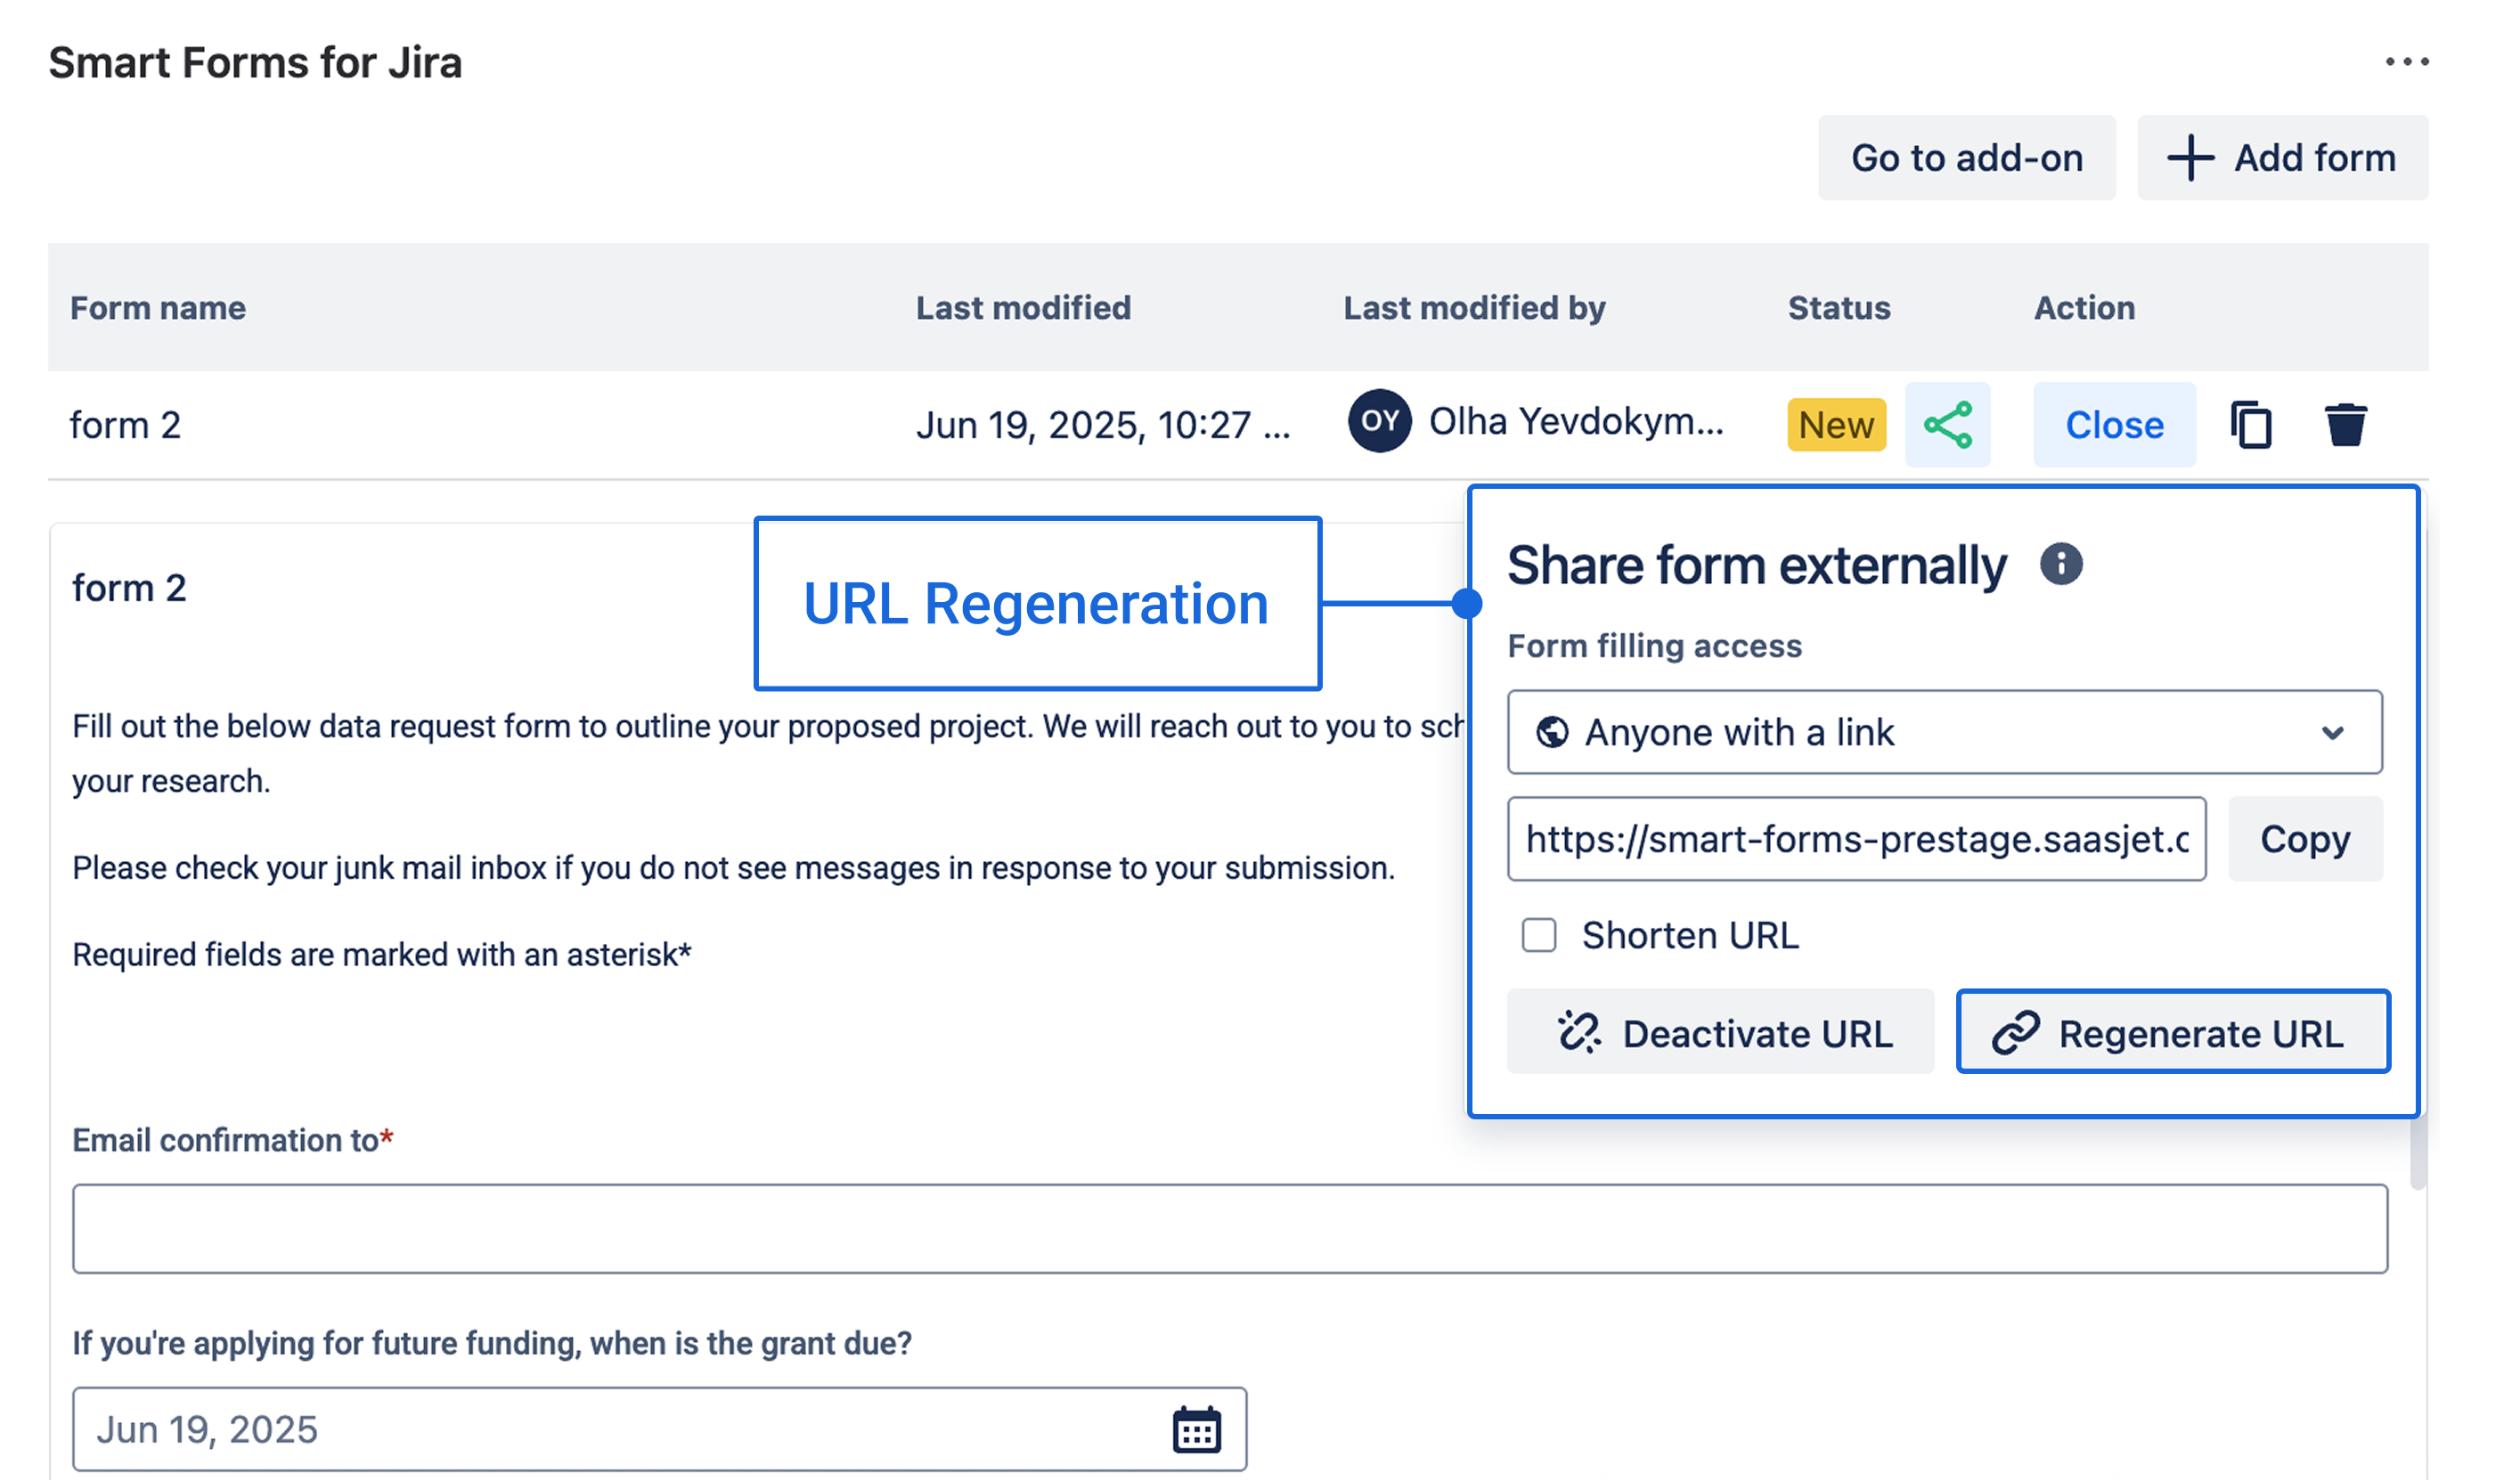
Warning: Regenerating makes the current form URL unavailable, including any existing shared links of this form.
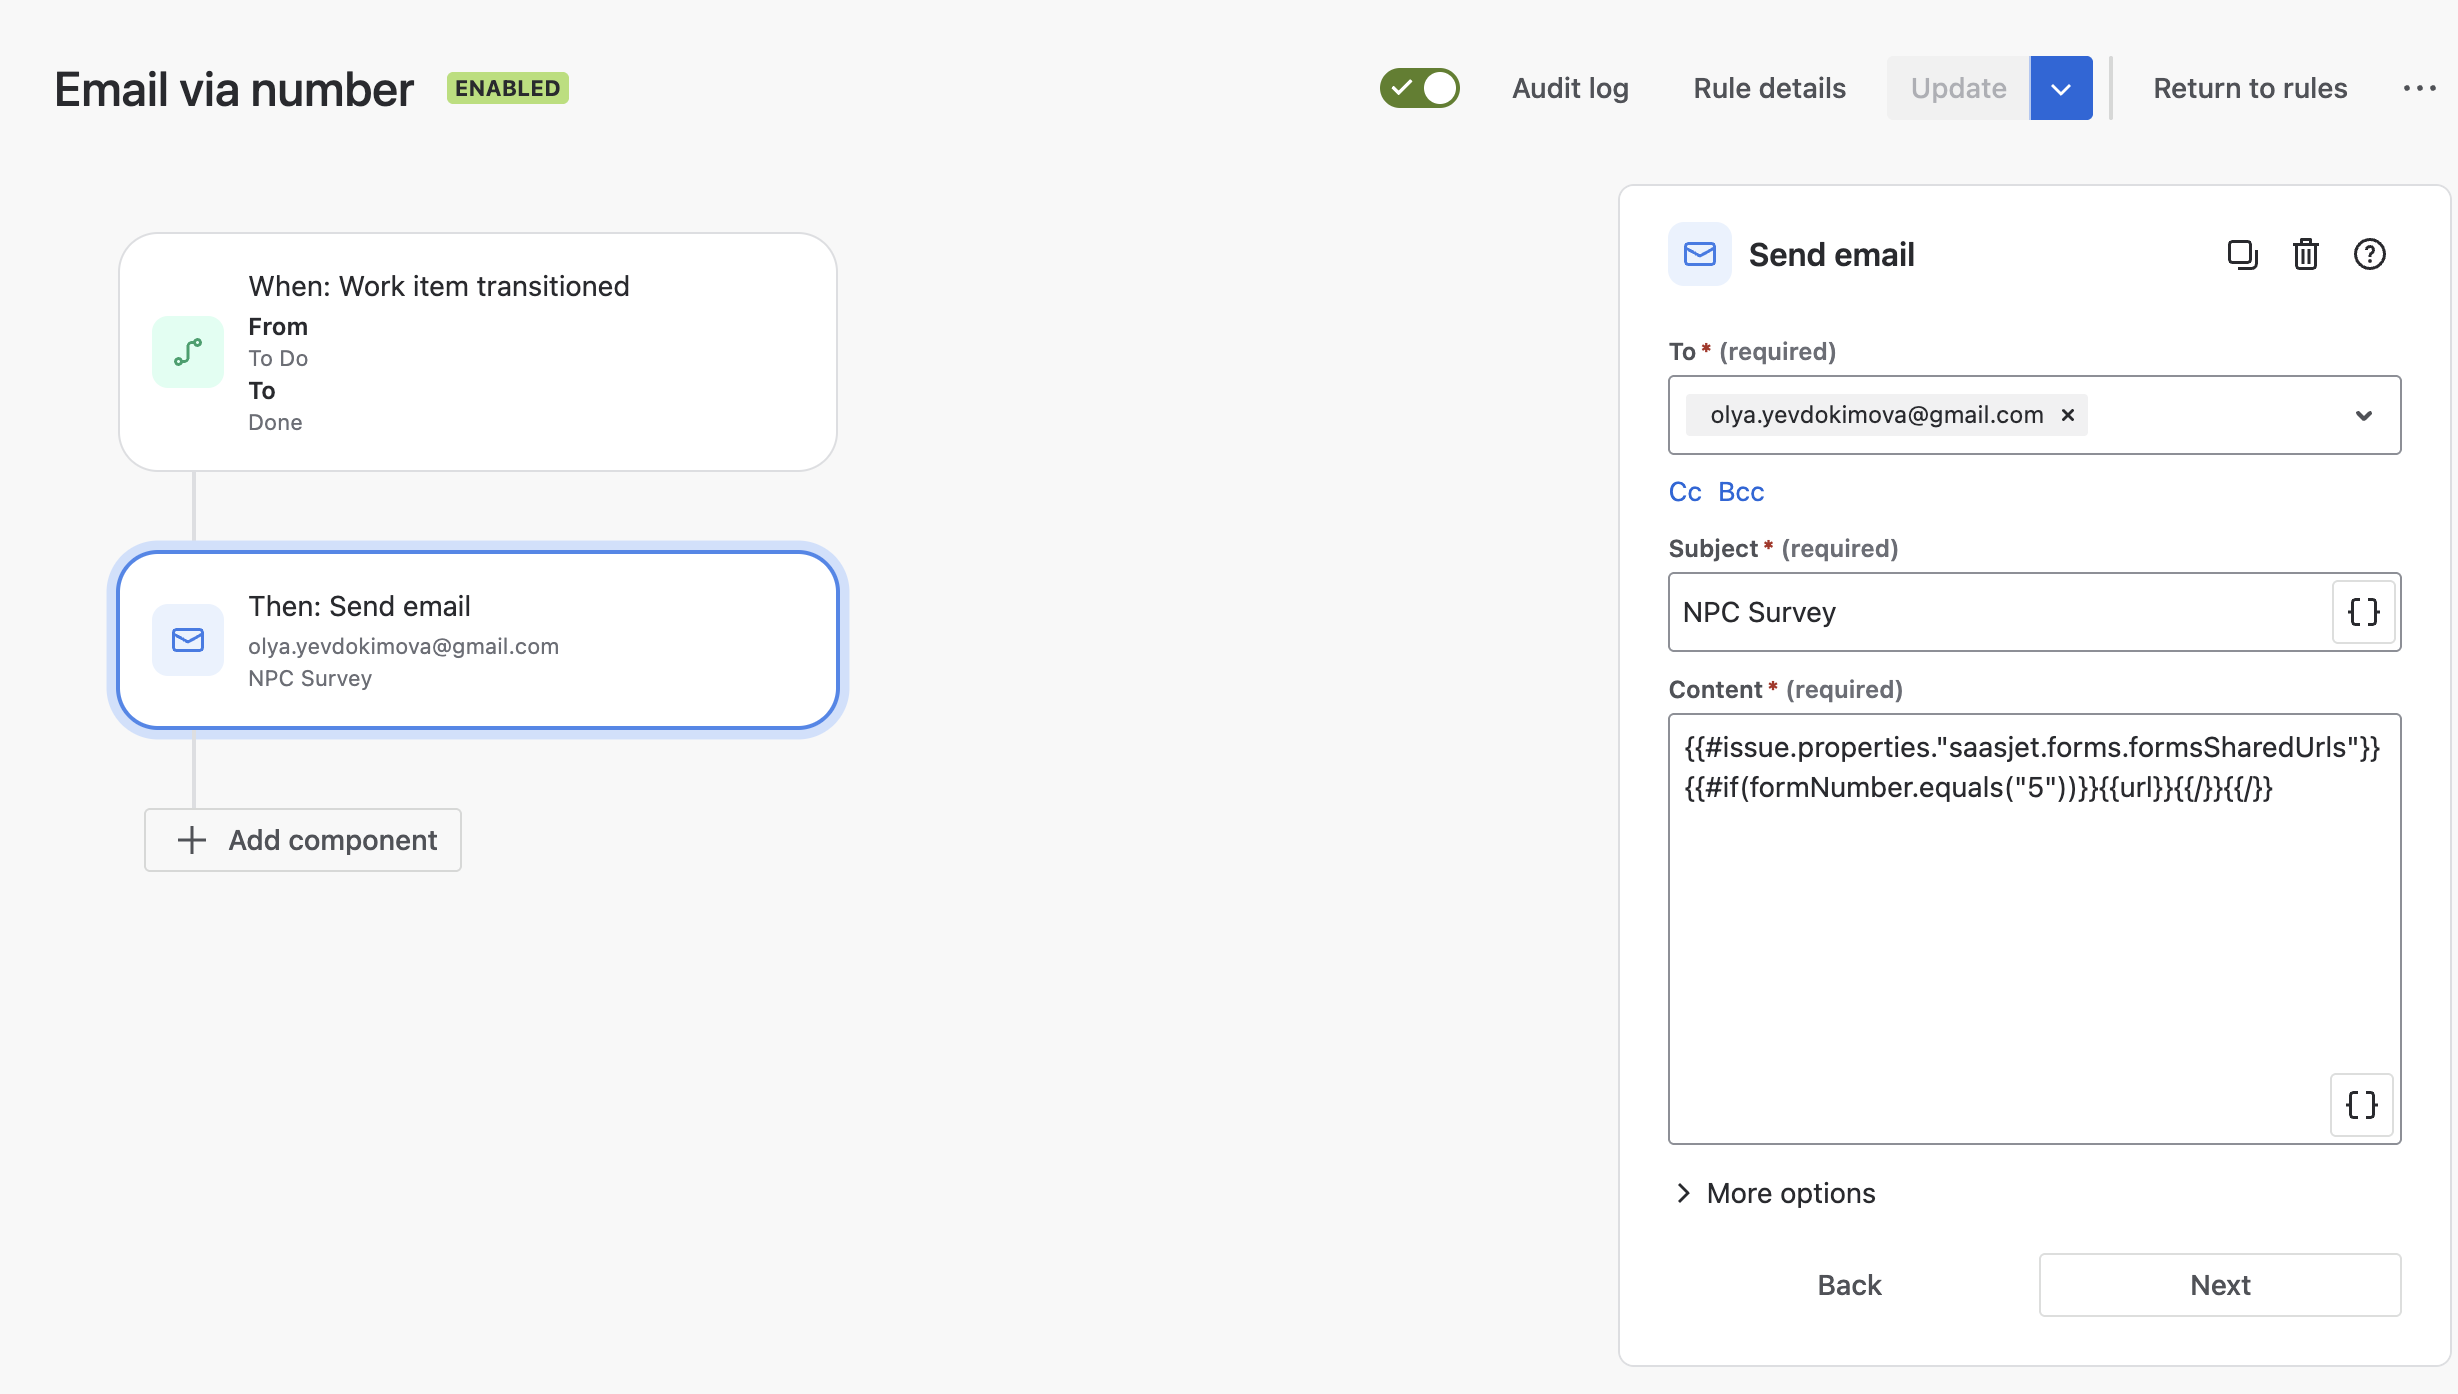
Automation Integration
Smart Value Access: Use this smart value in Automation rules to access form URLs:
{{#issue.properties."saasjet.forms.formsSharedUrls"}}{{#if(equals(formName, "Your Form Name"))}}{{url}}{{/}}{{/}}
Note: Replace "reopen" with your actual form's name. This field is case sensetive, so be carefull.
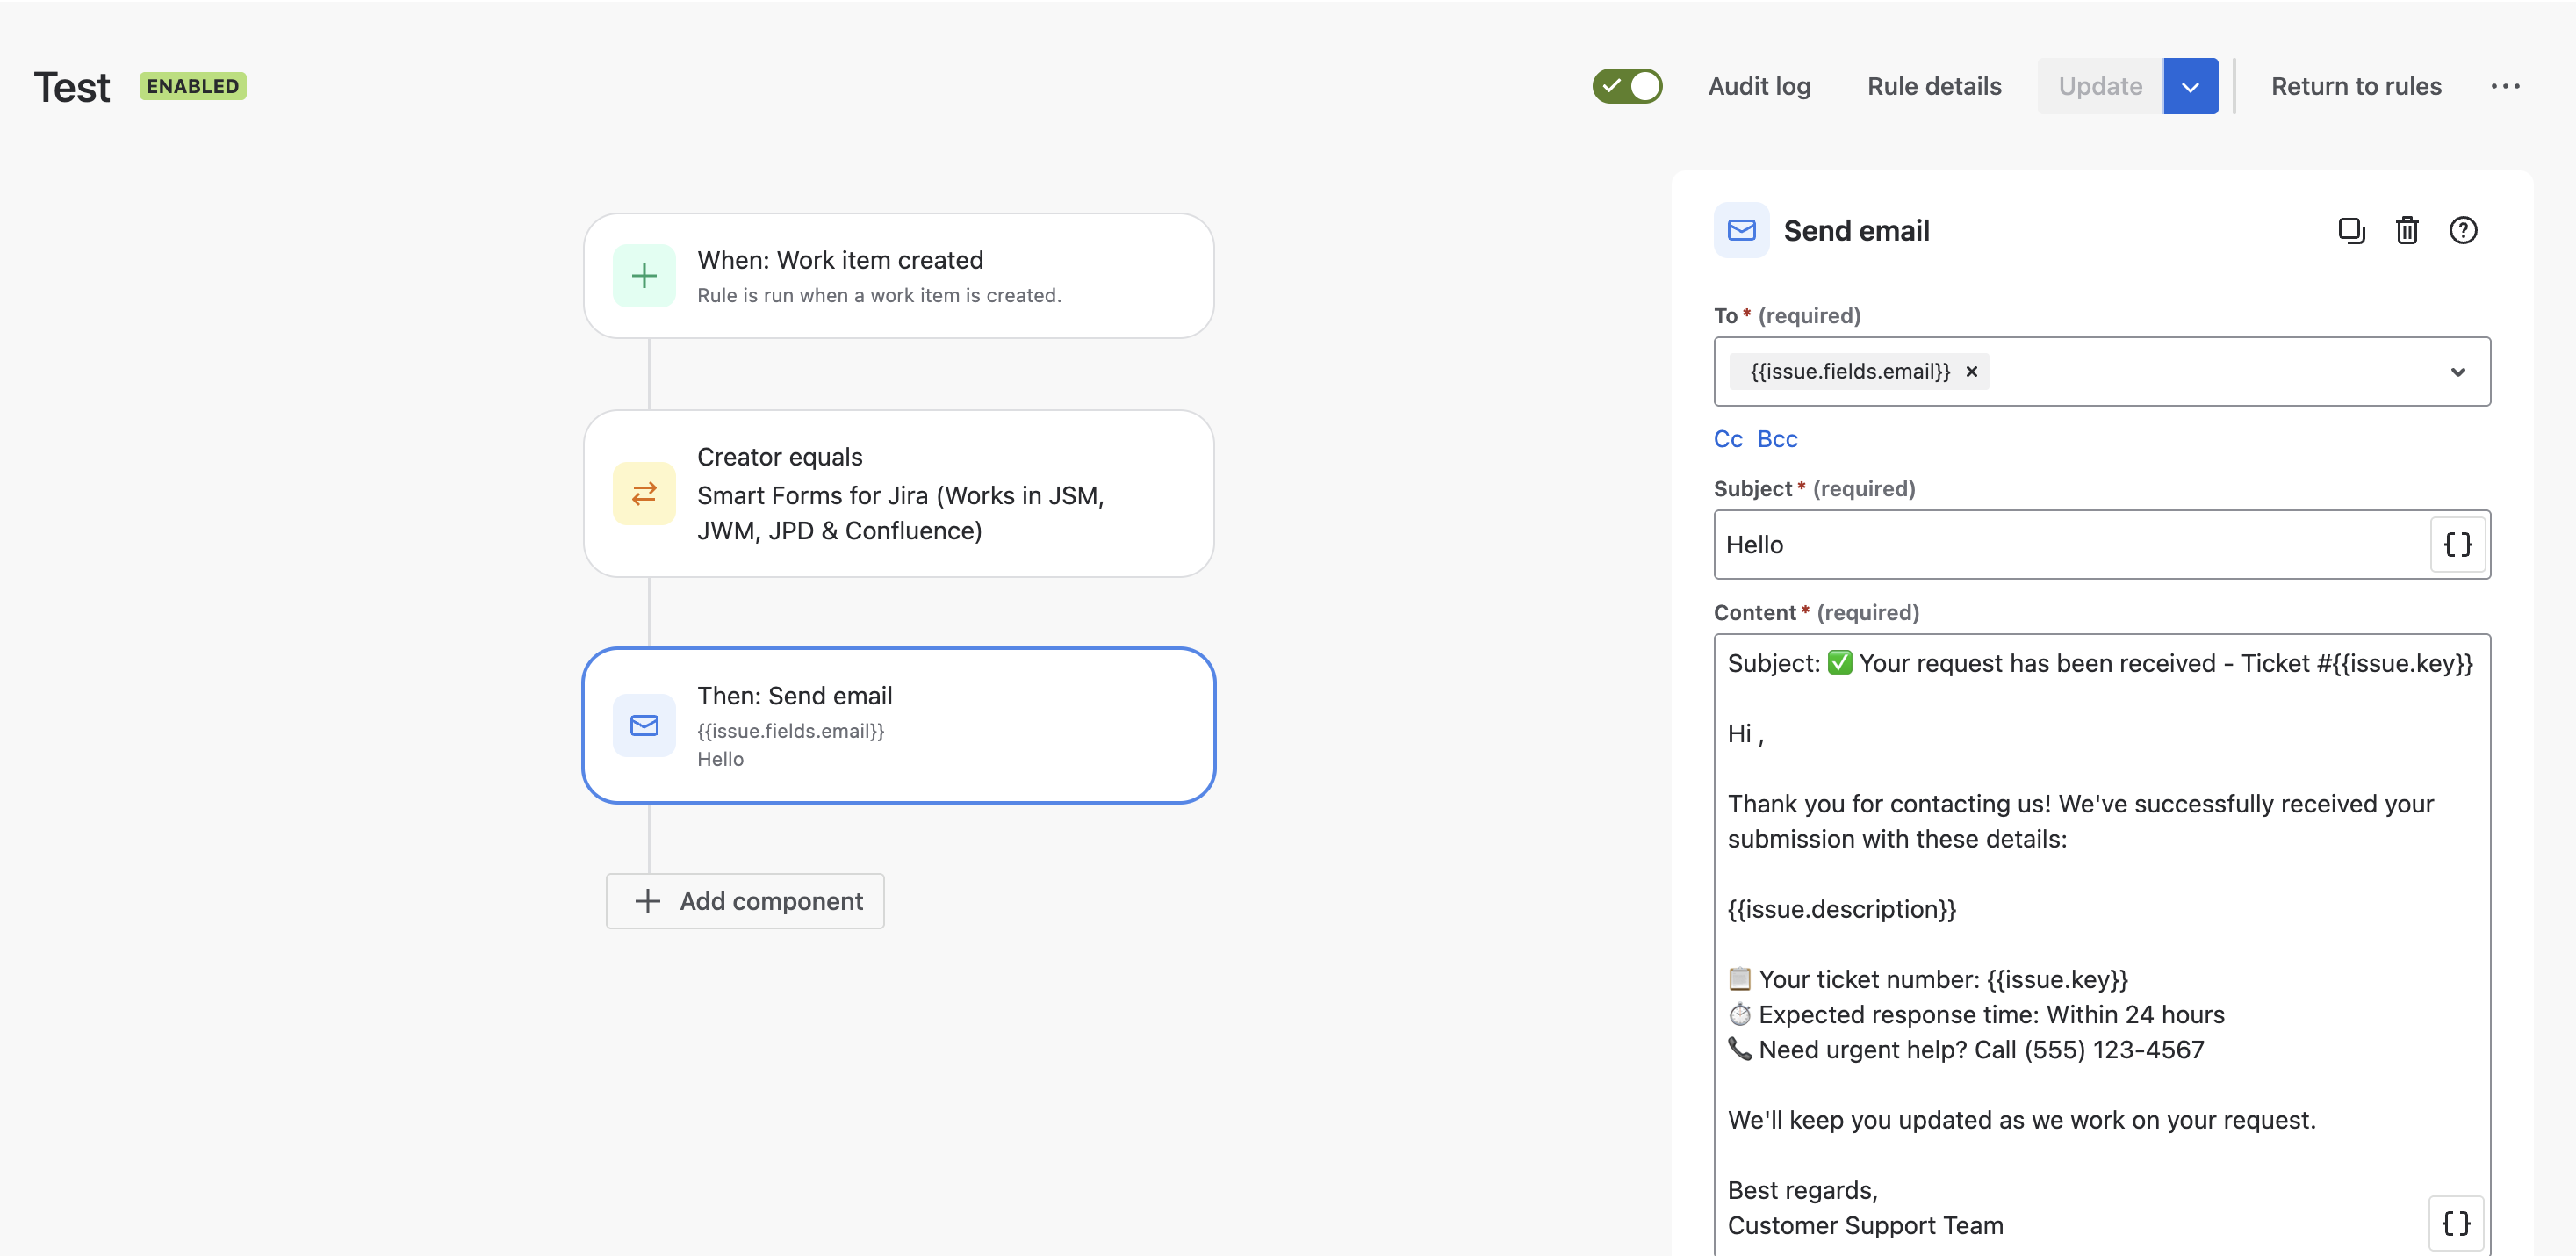
Email Configuration
Sending Emails to Customers
When setting up email automation, the customer's email address must be stored in a Jira field. In the Automation "To" field, you can reference this email using:
Field Name Method:
{{issue.fields.email}}
Where "email" is the name of your email field.
Unique Field ID Method:
{{issue.customfield_10255}}
How to Send a Specific Form Link from Jira Using Form ID or Form Number
This guide will walk you through creating a Jira Automation rule that sends an email containing a link to a specific form attached to an issue. We will cover two methods for identifying the form:
-
Using Form ID: A robust method for targeting a specific form type every time.
-
Using Form Number: A convenient method for targeting a form based on its position (e.g., the first form on the issue).
Method 1: Using the Unique Form ID
This method is best when you need to guarantee you are sending a link to a specific type of form, regardless of what other forms are on the issue.
Step 1: Get Your Form's ID
-
Add the specific form to a test Jira issue.
-
To view the issue's properties, navigate to the direct issue URL and add the following to the end: /properties/saasjet.formssmart-forms-stage.formsSharedUrls
-
Example: https://your-domain.atlassian.net/rest/api/3/issue/TASK-ID/properties/saasjet.forms.formsSharedUrls
Repace Work Item ID with your task with Form and replace your-domain with your site domain
-
-
From the JSON data displayed, find and copy the formId value for your form.

Step 2: Create the Automation Rule
-
In your project's Automation settings, create a new rule.
-
Set a Trigger, such as Issue transitioned (e.g., to status "In Progress").
-
Add an action to send email: In the email content use the following Smart Value to get your form via ID {{#issue.properties."saasjet.forms.formsSharedUrls"}}{{#if(formId.equals("e06a421a-a178-4377-a2ea-0adcd8bbe908"))}}{{url}}{{/}}{{/}}
You can use the Advanced compare condition to check if exactly one copy of your form exists.
-
First value: {{#=}} {{#issue.properties."saasjet.forms.formsSharedUrls"}} {{#if(equals(formId,"Your Form ID"))}}1+{{/}} {{/}}0 {{/}}
-
Condition: equals
-
Second value: 1

-
(Remember to replace YOUR_FORM_ID_HERE with your actual ID.)
-
-
Add an Action: Add the Send email action. In the email content, use the following Smart Value to insert the form's URL:
-
Please complete the form: {{#issue.properties."saasjet.forms.formsSharedUrls"}}{{#if(formId.equals("FormID HERE"))}}{{url}}{{/}}{{/}}
-
-
Save and activate the rule.
Method 2: Using the Form Number (Positional)
This method is useful when your workflow logic is based on the position of a form.
Step 1: Identify the Form Number
The formNumber corresponds to the order in which forms are added to an issue, starting with "1". You can verify this number using the same issue property URL method from Method 1, Step 1, and looking for the "formNumber": "1" value in the JSON. If you have multiple forms number one will be in the bottom of the list.
⚠️ Note: Even if a form is deleted from an issue, its metadata remains in issue.properties. As a result, newly added forms continue numbering sequentially. For example, if Form #3 is deleted, the next added form will be Form #4, even if it appears as the third form in the UI.
Step 2: Create the Automation Rule
-
Create a new rule and set your desired Trigger (e.g., to status "In Progress").
-
Add an action to send email: In the email content use the following Smart Value to get your form via form number {{#issue.properties."saasjet.forms.formsSharedUrls"}}{{#if(formNumber.equals("form-number(for example 1)"))}}{{url}}{{/}}{{/}}
-
Save and test the rule.
💡 Key Points
🔗 Auto-Generate: URLs is created automatically when forms are attached to issues
🔒 Security: User picker forms default to verified instance access
🤖 Automation: Access URLs via smart values in Automation rules
⚠️ Regeneration: Creates new URL but breaks existing links