
How to Prevent Lost Customer Requests gets lost with Email Workflow Automation
Picture yourself as an online seller. You might run your own ecommerce store, sell on Amazon, Etsy, eBay, or Shopify, and sometimes even finalize sales through Instagram DMs before asking customers to send order details via email. Many merchants operate across several sell-buy marketplace platforms, which means customer communication is constantly coming in from different directions - making email workflow automation essential to keep every request structured and actionable.
No matter which channel the sale comes from, one thing remains the same: the messages end up in your inbox.
And when your inbox becomes your “system,” things start slipping through the cracks:
a customer asking for a delivery update
a buyer confirming their purchase
someone requesting a shipping address change
a follow-up message saying, “I ordered last week, has it been shipped?”
In many cases, these emails are directly connected to tracking the order. When they’re overlooked, customer frustration builds quickly.
That’s why many sellers move beyond manual email handling and convert incoming messages into trackable tasks inside monday - using Email to Tasks for monday.com (Gmail integration). It’s a simple way to convert email to task Gmail workflows in just seconds.
The goal: turn every email into a trackable item in monday.com
Instead of manually copying order details from Gmail into spreadsheets or separate systems, Email to Tasks lets you instantly transform any email into an item on your monday board. This way, your team can track progress, assign responsibility, and ensure nothing gets lost.
You can:
Use an existing preset for quick setup
Or create a dedicated preset for specific workflows such as Orders, Returns, Support, or VIP customers
If you need guidance on creating a custom preset, we explained the process step by step in our article:
How to Manage Order and Shipping Communication Inside monday.com
Now, let’s walk through how the workflow looks in practice.
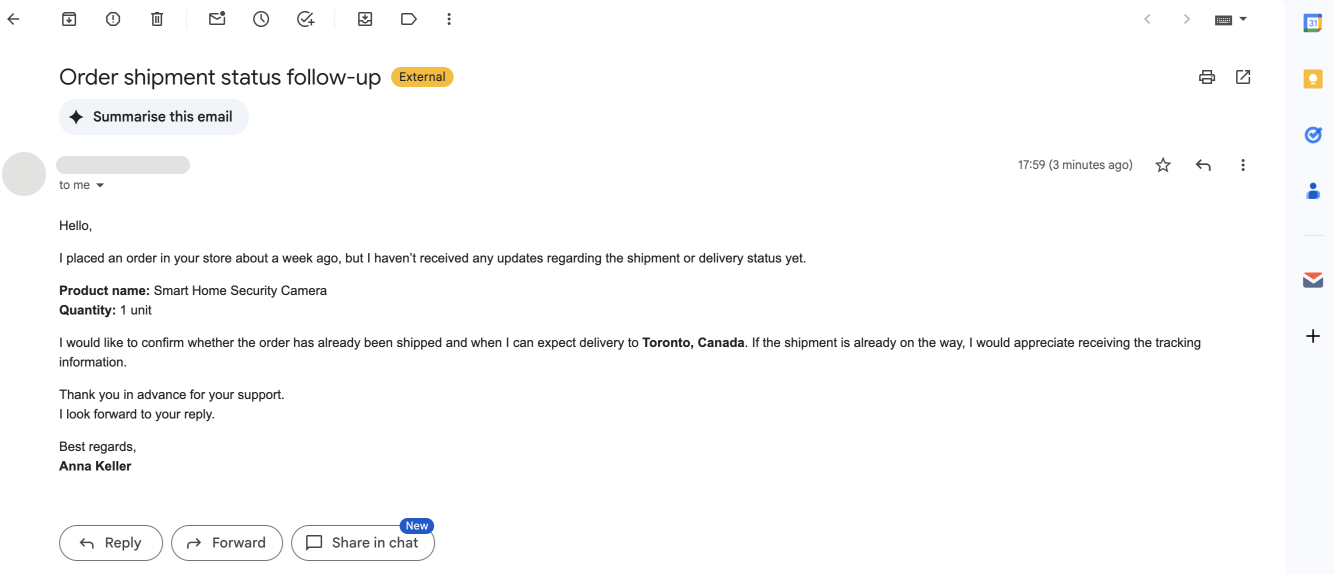
Step 1: A customer email arrives
In the first screenshot, you see a typical follow-up email from a customer:
They placed an order about a week ago
They haven’t received shipment or delivery updates
They mention the product name, quantity, and delivery location
This is exactly the type of request that often gets overlooked, especially when you’re juggling Amazon sales, other marketplaces, and social media inquiries at the same time.
Instead of leaving the email in Gmail, the next step is to convert email to task Gmail using Email to Tasks and move it into a structured system.
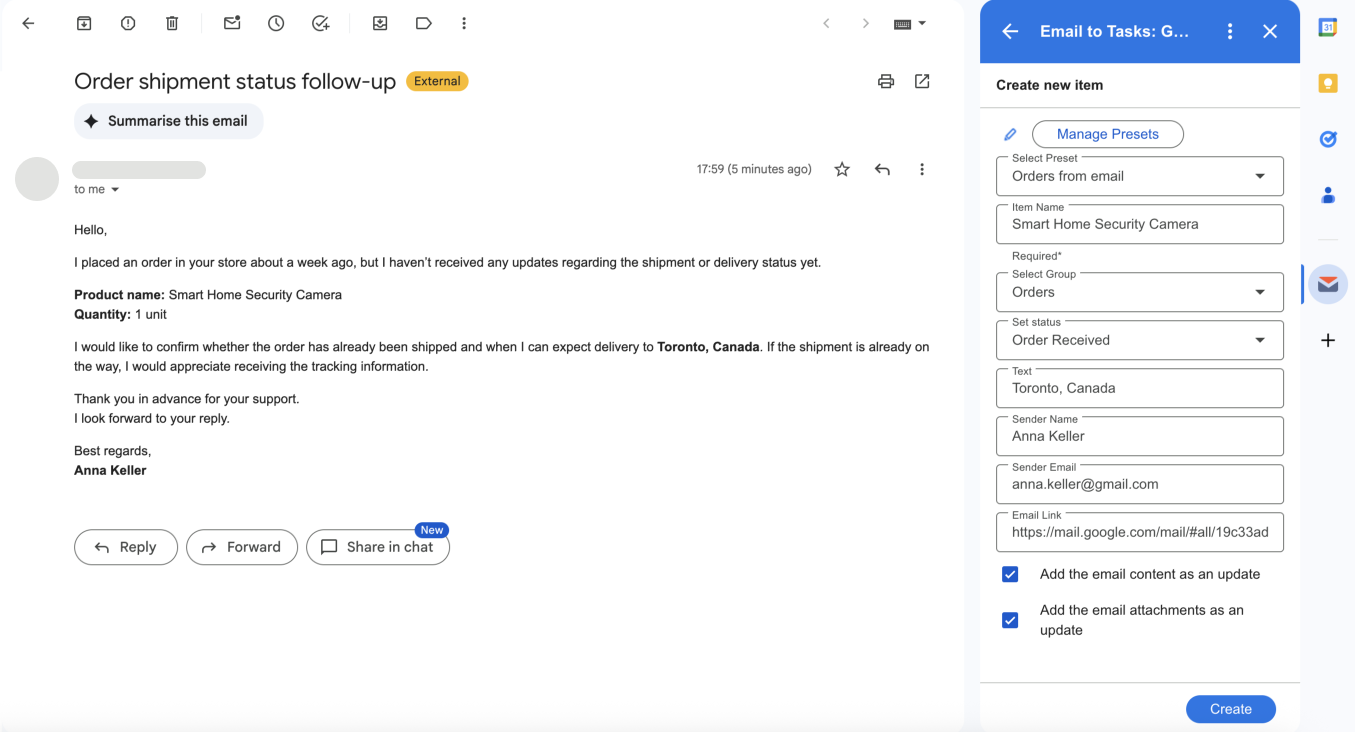
Step 2: Open Email to Tasks and select a preset
In the second screenshot, you open the Email to Tasks panel inside Gmail.
Here, you:
Select a preset (for example, “Orders from email”)
Confirm the board and group where the item will be created
Review the mapped fields before finalizing
This is where you define how the email will be organized once it enters monday.
If no preset exists yet, you can create one, and as mentioned earlier, the detailed setup process is covered in the previous article.
Step 3: Automatic field mapping
Inside the Email to Tasks panel, most fields are automatically filled based on your preset configuration.
From the screenshot, the information is mapped as follows:
Item Name → Smart Home Security Camera
Group → Orders
Status → Order Received
Location → Toronto, Canada
Sender Name → Anna Keller
Sender Email → anna.keller@gmail.com
Email Link → Automatically saved
This is particularly useful for tracking the order, since the original email remains attached to the task for full context.
You can also choose to:
Add the full email content as an update
Attach files automatically
Instead of manually transferring data, you simply review the details and click Create.
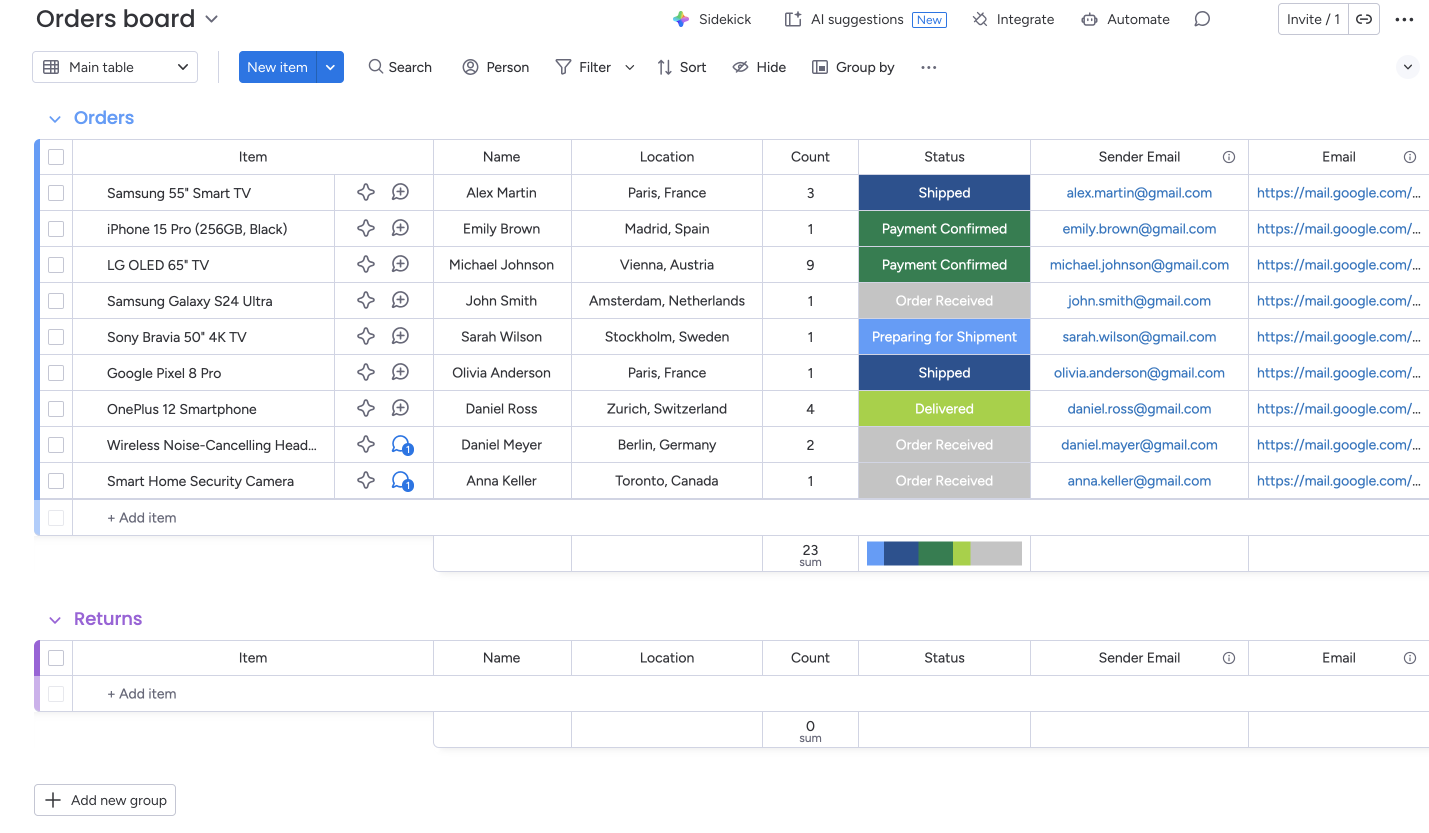
Step 4: The email becomes an item in your Orders board
In the final screenshot, the new item appears instantly in your monday Orders board.
The message is no longer “just another email.” It becomes:
Visible to the entire team
Assignable to a specific owner
Trackable by status
Easy to update and follow up on
Searchable later with the original email attached
This is how you build a workflow where customer requests cannot quietly disappear,
especially when you operate across multiple sell-buy marketplace platforms and communication volume increases daily.
Why this works for marketplace sellers
If you sell across several platforms, requests will continue to arrive from different directions. But internally, you still need one centralized system to manage them.
Email to Tasks creates that structure:
Every request becomes a task
Every task lives inside the same board
Every stage is visible
Every conversation stays connected to the item
Even when sales originate from Amazon, other marketplaces, or social media, your inbox becomes an intake channel, not your operational system.
Final thought
Customer requests don’t get lost because your team lacks dedication. They get lost because inboxes were never designed for operational tracking.
With Email to Tasks, every important email becomes a structured, trackable item inside monday. Orders, delivery questions, and follow-ups remain organized, visible, and actionable - exactly where they belong.
🔗 How to Install the App
👉 Install from monday.com Marketplace
Go to your monday account.
Open the Marketplace from the left-hand menu.
Search for the app by name and click Install.
Follow the prompts to complete the setup.
👉 Install Chrome Extension (for Jira & monday.com)
Open the Chrome Web Store.
Search for the extension (for Jira & monday.com).
Click Add to Chrome, then confirm Add Extension.
Once installed, log in to your account to connect it with monday.com.
📬 Need Help?
If you need assistance with setup or have any questions, reach out to our team:
📩 support@saasjet.com – we’re here to help!