
How to Manage Order and Shipping Communication Inside monday.com
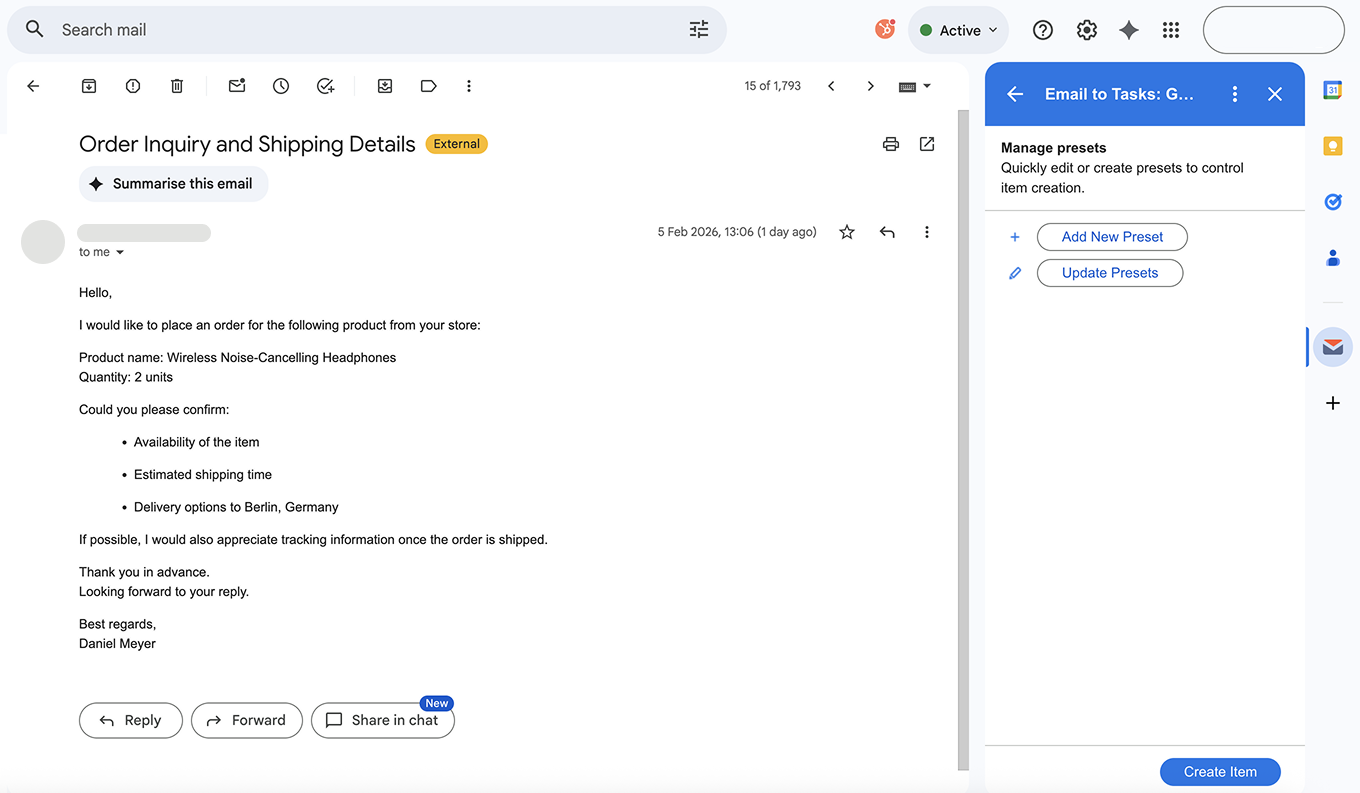
For many online stores and marketplace sellers, email remains one of the primary channels for receiving order requests, shipping inquiries, and delivery follow-ups.
But just as frequently, these emails get lost:
buried under newer messages
overlooked during busy hours
forwarded between teammates without clear ownership
As a result, orders are delayed, shipping updates are missed, and customers start asking where their package is.
Instead of letting important messages sit in your inbox, Email to Tasks for monday.com allows you to convert any email into a structured task with a single click - keeping all order-related details organized in one place. This is the foundation of a reliable and scalable order management workflow.
Creating a preset to control where orders are stored
After enabling the Email to Tasks app in Gmail, your first step is to create a preset.
Presets help you define exactly where incoming order emails should go and how they should be structured inside monday.com.
A preset determines:
Which workspace will be used
Which board will store new orders
How email data maps to your board columns

For example:
Workspace: Main workspace
Board: Orders board
Group: Orders
This ensures that every order-related email is automatically routed to the correct location inside your monday board.
Mapping email data to monday fields
Once your preset is configured, you can map email details to the columns that already exist on your board.
And if your process evolves, presets are flexible, you can update them at any time:
Add or remove fields
Adjust column mappings
Create multiple preset variations for different workflows
This flexibility allows teams to adapt quickly and save time by selecting the right preset for each type of incoming email.
Typical field mappings include:
Item name → Product name from the email subject or content
Status → Automatically set to Order Received
Sender name → Customer name
Sender email → Customer email address
Email link → Direct link to the original message
Text/Number column → Quantity or order details
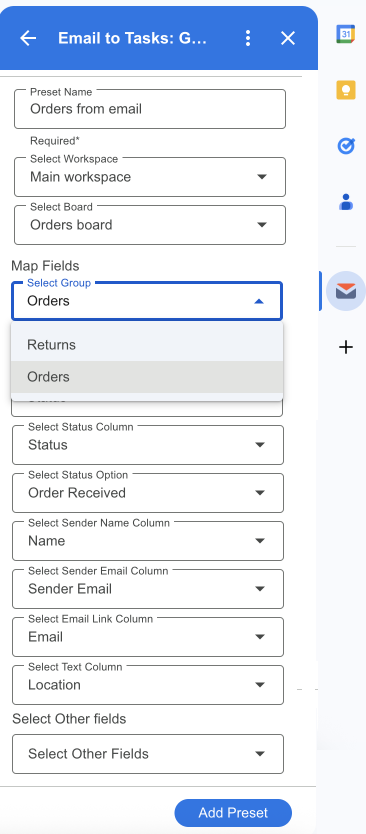
With this structure in place, key information is captured consistently, ensuring smooth shipping communication and internal transparency.
Creating an order item from an email
After selecting the preset, Email to Tasks automatically pulls data from the email and fills in the mapped fields.
Here’s what happens automatically:
The product name becomes the item name
The customer’s name and email are added to the board
A direct link to the original email is saved
The email content can be added as an update
With just one click, a new order item is created, without manual copy-pasting or data entry.
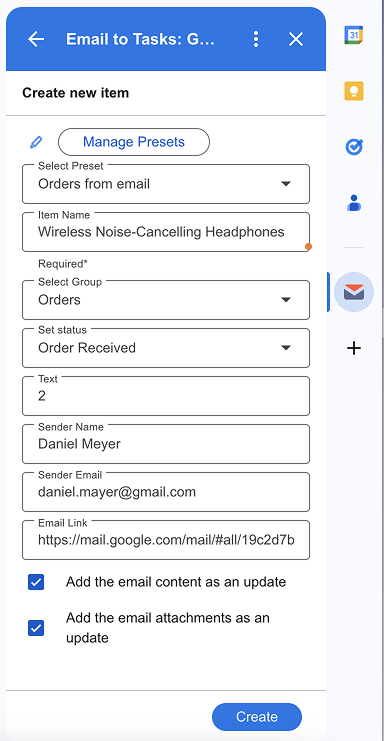
This makes Email to Tasks workflows fast, consistent, and reliable.
If you have any questions, feel free to book a free monday consultation with our app specialist, we’ll be happy to help.
Managing shipping communication inside the board
Once the order appears in your board, communication becomes structured and easy to manage.
Your team can:
Update order status as it moves through fulfillment
Add shipping updates as comments
Track delivery progress
Keep the full email history attached to the item
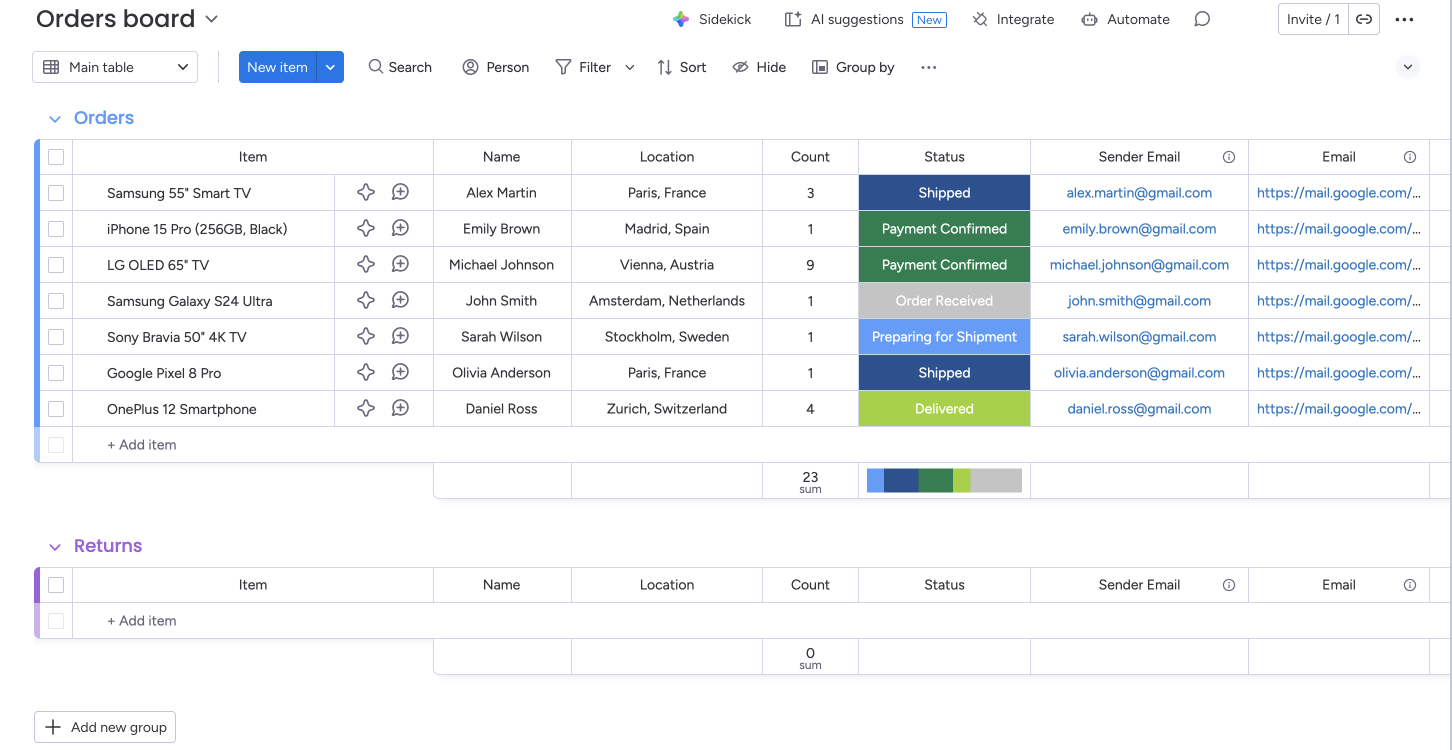
Instead of searching through inbox threads, your team works from a single source of truth inside.
Why this approach works
By converting emails into tasks, teams gain:
Clear visibility into every order
Faster response times
Fewer missed shipping updates
Better collaboration between sales, operations, and support
Most importantly, order and shipping communication becomes predictable, organized, and scalable as your business grows.
Final thoughts
Email will always be a key communication channel for customers. The real challenge isn’t receiving emails, it’s managing them effectively.
With Email to Tasks for monday.com, teams can turn unstructured messages into structured, trackable work. Data capture becomes automated, order management becomes centralized, and no customer request gets lost.
If your goal is to manage order and shipping communication inside monday.com, this solution gives you clarity, speed, and control, from the first email to final delivery.
🔗 How to Install the App
👉 Install from monday.com Marketplace
Go to your monday account.
Open the Marketplace from the left-hand menu.
Search for the app by name and click Install.
Follow the prompts to complete the setup.
👉 Install Chrome Extension (for Jira & monday.com)
Open the Chrome Web Store.
Search for the extension (for Jira & monday.com).
Click Add to Chrome, then confirm Add Extension.
Once installed, log in to your account to connect it with monday.co,.
📬 Need Help?
If you need assistance with setup or have any questions, reach out to our team:
📩 support@saasjet.com – we’re here to help!