
|
📝 Context: Configuring the representation of the latest change in status, priority, task type, comment, or other fields in Jira can help you track important updates and changes. This guide provides step-by-step instructions to create a custom field and set up an appropriate rule in Jira Automation to display when an issue has been moved to the current status. |
|---|
|
🤔 User Problem: Users need a way to track the latest changes in status, priority, task type, comments, or other fields to ensure they have up-to-date information and can monitor changes effectively. |
|---|
If you need to configure the representation of the latest change in status, priority, task type, comment, or other field, this short guide will be helpful for you.
An example of status another field displaying is described below.(The logic of displaying the other fields does not change).
To see when the issue has been moved to the current status, you need to create a custom field and set up an appropriate rule in Jira Automation. Follow the instructions below:
-
Go to the Project settings.
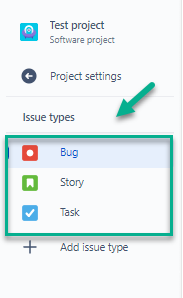
2. Tap on the “Issue Types” option.
3. Choose a necessary Issue Type for which you want to apply automation.
4. Create a Time stamp by tapping on a “Time stamp”.
5. Enter the field name as it’s shown on a screen below and click a “Save changes” button.
6. The field that you have created for a current issue type (Bug on a screen) should be added for other issue types where the same automation should be applied.
7. In the search field displayed on a screen find a field that you have created in the step 5. Click on it to choose.
8. Move to another issue type (Story on a screen below).
6-8 steps should be done for each issue type you need to apply the automation for.
9. Then click “Project settings”.
10. Click “Back to project”.
11. Then click Project settings again.
12. Go to the Jira “Automation”.
13. Then create a rule for automation by tapping the “Create rule” button.
14. Choose Field value changed as a trigger
Select Status as a field to monitor changes;
Change the type: Any changes to the field value
And click the “Save” button.
15. Click the “New action” option to add a new component.
16. Choose “Edit issue” as a new action to update necessary issue fields.
17. Type the field name in a given field and put a tick near the necessary one.
18. Write the necessary time of changes (as it’s shown below) and click “Save” button.
19. Add the dynamic parameter of a date {{now}} and click the “Turn on” button.
20. Click the “Create” button to create an issue.
21. Fill in the necessary fields and click “Save”.
22. Click “View issue” in the bottom left corner.
23. Here’s a complete issue with a necessary field.
|
📈 Outcomes:
|
|---|
If you need help or want to ask questions, please contact SaaSJet Support or email us at support@saasjet.atlassian.net
Haven’t used this add-on yet? Try it now!